
c-u-r-r-u-m-p!
c-u-r-r-u-m-p!
Saturday morning's siren call. My mom and her shears.
Methodically slicing through the delicate tissue paper, the foundation for a skirt, a sleeve, a dress.
My mom once asked me to help sew some chair backs for her classroom. "It's just straight lines," I thought. "No big deal."
I'm certain I made more of a headache than my "help" was worth.
A bad first experience, to say the least.
15 years later, with the encouragement of you fellow bloggers, I asked to try again.
My first venture, a success.
My second, a garment bag, here. Fodder for future projects. Encouragement to try something new.
♥ Kimberly


Step 1: Iron the two right sides together for more-precise cutting. Cut the material for the size of bag you want. Mine was a 13-by-31-inch piece of fabric that eventually created an 11-by-13-inch bag.
Step 2: Pin together (with right sides facing) the two pieces of material.


Step 3: Sew together, running along your pins, about 5/8-inch in.
Iron the material again. (I probably iron too much, but it doesn't hurt, right?)
Step 4: Flip the material inside out, with right sides facing out. Then iron along the seam to create a fold.
Step 5: Create your channels. At the ends, I tucked under the material and created a small hem for a more finished product.

Then fold the ends over to allow for your string's channel. I pinned it down 1-1/2 inch and stitched 1/8 of an inch from the inner edge.
Then iron the channels.
Step 6: Fold the pouch in half so the inner material is facing out. Stitch long sides with a 1/4 to 5/8 inches seam. Be sure to leave 1 1/2 inches at top for the channels. Then flip the bag outside in.
Step 7: For your channel, you could also use ribbon, material, rope, etc. I used quilt binding.
Fold the binding in and stitch along the edges to keep the binding in place.
Cut two strips of string or cord the width of the bag plus three to four inches. Or cut a strip twice the width of the bag plus three to four inches. And then cut it in half to make two, or don't cut and leave only one end to sew.
To make getting the binding through the channel easier, attach a safety pin on the end and pull it through the best way you can.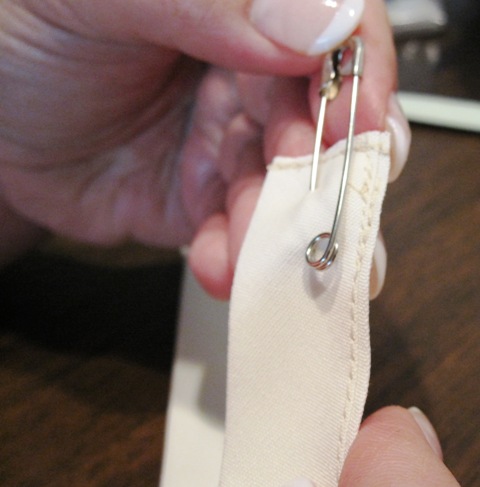

Step 8: To finish, you can either stitch together the ends of the binding or tie them. For this bag, I chose to stitch the binding together and then turn the binding into the bag so the ends weren't visable.
And then you're done! Really not that hard (for us newbies). And you can always use a bag, right? Make this bag in a variety of sizes - for jewelry, clothes, shoes, etc.
See something you like? Print it. Share it. Email it. But please, link back here when you do.
5 comments:
Great job! It's nice that you have someone to show you the ropes. Oh, and I dig the polka dots!
Your mom must be so proud!! Nice job! Smiles!!
www.blackberryvine.blogspot.com
Love the garment bag!! Thanks for linking @Creative Itch's "Sew Cute Tuesday"!
i LOVE that fabric!!!
That looks great! Thanks for sharing! I'm glad you gave it a shot because I LOVE IT! thank you for sharing
Post a Comment