Showing posts with label guest blogger. Show all posts

Friday, June 25, 2010

Cupcake Carnival: Tierra from Pebbles and Poppys

Hi, my name is Tierra and I have a little blog called Pebbles and Poppys. I have many different things on there such as crafts, tutorials, recipes, photography, downloads and whatever else I can think of.

I was tickled pink to have Kimberly ask me to submit an idea for her wonderful Cupcake Carnival. I have so many ideas running through my head it's hard to choose. Here is what I came up with.

I have this daughter.... who has this aunt..... and they both love cupcakes. Every time they are together they have to make cupcakes. It's a tradition with them and it's always something they look forward to.

About a year ago Auntie decided to branch out with the cupcakes and get Caelan an apron with cupcakes all over it. Of course Auntie had to get a cupcake apron too. The two of them are so cute about their cupcake parties. It's even gotten Mom, Dad, Grandpa and Grandma hooked into the parties. (You see Caelan is the only girl on this side so anything girlie is so much fun.)


Auntie even got a baking pan that made a HUGE cupcake cake. I think Caelan was trying to claim the whole thing. That made us laugh a little.


We saw this book one day and HAD to get it for Auntie because it was so perfect. Auntie has a cat that she loves and what's better than giving a cat a cupcake?


For a lot of people that don't have the option of eating everything they want there is a website called Gluten Free Goddess. She has many different recipes for cakes and cupcakes that look really yummy and are gluten free. Click on the picture to take you to the post with all the recipes on it.


The other two blogs that my SIL sent me to are Coconut and Lime and Cupcake Project. Check them out. They are yummy recipes.

I also went to a local cupcake shop to try them out and ended up with 6 cupcakes instead of 2. Yeah right. Like I was going to only just get two. The cupcake shop is called Icing on the Cupcake.

Thank goodness the shop isn't just around the corner or I would have problems.

This cupcake I got for my son. Perfect right? It's called the Kiddie Cake.


My daughter loves pink so I knew this is the one she would choose. This one is called the Pink Delicious and it is their signature cupcake.


Here are some of my favorites that I bought. The Red Velvet is my favorite. I just love cream cheese frosting. The other two are Chocolate Macaroon and Caramel Apple. My husband doesn't like apple desserts and kept ribbing me about getting that one over the Mint Chocolate one. It's been two weeks and he still ribs me. *sigh* I think I am going to have to make him a chocolate mint something just make amends. I do have to say that the Caramel Apple one was good though.


The last cupcake of the bunch that I bought was the Raspberry Lemonade. That just makes your mouth water when you hear that right? It made my mouth water just biting into it too. It had a kick to it and a perfect balance of sweetness.
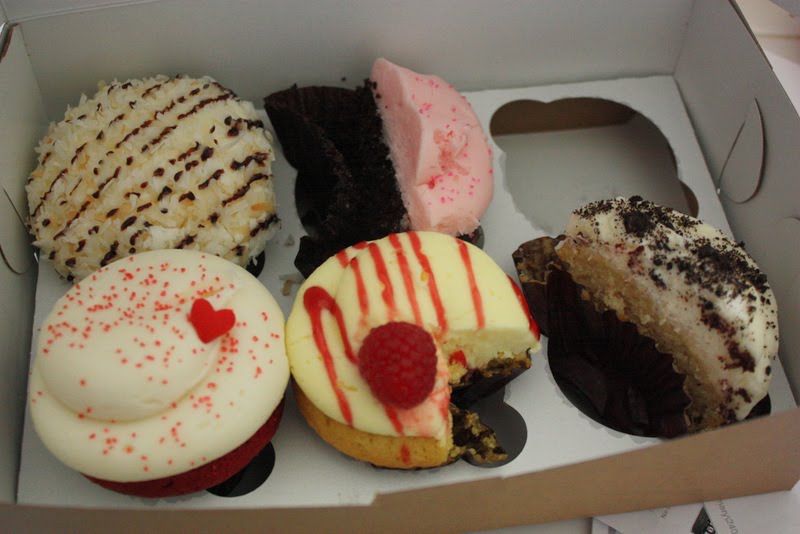

All in all I loved the cupcakes but I really don't want to ever go back in because they are kind of pricey. It was $15 for the 6. I split a dozen with a friend that came with me. For those that know me, I am a bargain shopper and that much on cupcakes is a once in a blue moon kind of purchase.

And to leave you with a little something for stopping by, I have created a printable card for you to download and use. Just click on the picture and it will take you to a website that you can download this for free. Enjoy!


Signature
www.pebblesandpoppys.blogspot.com


See something you like? Print it. Share it. Email it. But please, link back here when you do.

Cupcake Carnival: Stephanie Lynn from Under the Table and Dreaming

Hello Cupcake Lovers!
I'm Stephanie Lynn from
Under the Table and Dreaming
UndertheTableandDreaming

I'm so excited to be participating in
Kimberly's Cupcake Carnival!

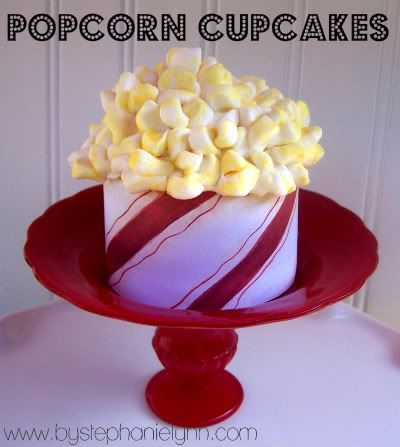
I love to take a theme and run with it for my little guy's birthday parties. For his second year bash we held a Carnival Extraordinaire {here} and of course we had to have a themed cupcake to go along with the festivities; What carnival isn't complete without some popcorn!


These are very simple and easy to put together and they don't require any special decorating skills, I promise!


You want to begin with a cupcake of your choice. I used a large cupcake pan to bake my cupcakes, however, these can be made with any flavor batter or size pan. {Dare I even say, store bought cupcakes would work too!}. You want to ice your cupcake with any type of white frosting, preferably creating a swirl mound. This will give height to your popcorn pile.


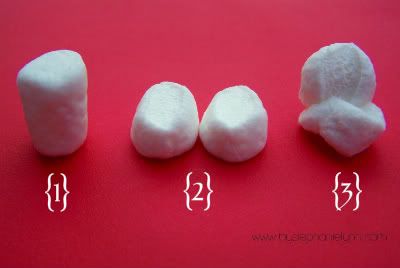
To create the 'popcorn' you will need {1} mini marshmallows as shown in photo above. {2} Using a knife cut the marshmallow in half. {3} Squish the two cut halves back together at one end. You will need quite a bit to cover a batch of cupcakes so while your cupcakes are baking you can work on this step and place them in a ziploc until you are ready to decorate.


Working in a random pattern, begin placing the prepared marshmallows onto your cupcake. The icing will hold them in place. You want to make sure you cover as much icing as possible, leaving as little of space possible between each piece.


To add a 'butter' effect to the popcorn, take a tiny bit of water, add two drops of yellow food coloring and mix well.


Using a paint brush {preferably not the ones you have already used crafting =)} lightly brush on the water mixture to your marshmallows.


I found a neat red and white striped scrapbooking paper at my local craft store which I used to make simple wrappers to cover the cupcake liners. I cut the paper into strips {wide enough to cover the entire cupcake liner} and taped the ends together to create a circle. You want the circle to be the circumference of the top of the cupcake; where the liner meets the cupcake. This will allow the cupcake to nicely fit into the wrapper and only expose the 'popcorn' top.


Yummy Goodness!


I hope you all have a fabulous weekend ~ Stop by and say 'Hi' if you get a chance!
I'll show you how to put together these cute stands =) Enjoy!
Thank you so much Kimberly for letting me celebrate Cupcakes with you and your readers!


See something you like? Print it. Share it. Email it. But please, link back here when you do.

Thursday, June 24, 2010

The Hummingbird Bakery : Guest Post from Beachbrights


Hello Attempting Creative Readers! My name is Beachbrights and I am a Decorator, Organizer, Shopper, Blogger, Cook, Seamstress, Book Reviewer and Herder of Son & Husband (not necessarily in this order).

Those of you who know me, know I can't bake. Cook, yes. Bake, no and yes, there is a difference. However, that has all changed my friends. I now can bake cupcakes. Here is my review of this simply marvelous, magical cupcake recipe book. Buy it. I promise your cupcakes will be TO. DIE. FOR.


The Hummingbird Bakery Cupcake Kit
*contains cookbook & 100 cupcake cases
by Tarek Malouf
Feb 28, 2010
ISBN-13: 978-1845979935

My Review: For this review I completed the vanilla cupcakes recipe (page 16) with vanilla icing (page 11). Honestly, I wanted to try the red velvet cupcakes with cream cheese icing but I have never had success with baking cupcakes and I did not want to try a recipe that required any additional work than necessary. The vanilla cupcakes turned out so delicious and perfect, I wish I had made the red velvet. Now I have the confidence to make both. Honestly, when I tell you I can't bake, I mean it. This is my very first successful batch of cupcakes.

What I loved most about this book is the simple ingredients and small serving sizes. The recipe did call for caster sugar which I found I could make my own by putting regular sugar in a food processor.


I also had to buy unsalted butter and whole milk, both common ingredients but not what I normally keep on hand. Everything else I had (of course every kitchen will be different). The book is small but very cute and Peter Cassidy does a great job photographing all the different varieties of cupcakes & muffins. Several to cupcakes note: vanilla, red velvet, chocolate, lemon, strawberry cheesecake, black bottom, lavender, banana & chocolate, green tea, pumpkin, & marshmallow. Several muffins to note: carrot & zucchini, spinach & cheese, blueberry and maple & pecan. Buy this book. 5 stars!


*One thing I would note. I like my cupcakes to have a little more icing on top. Next time I will consider doubling the icing recipe.

The Hummingbird Bakery

~XOXO~

Wednesday, June 23, 2010

Cupcake Carnival: Lindsey from The Lovely Paper Blog


Hello! I am Lindsey from The Lovely Paper Blog! I was delighted when Kimberly asked me to guest post during her yummy Cupcake Carnival because I LOVE anything to do with cupcakes!


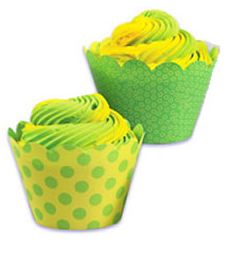
I love making cupcakes, because they are so yummy and they can be so cute! I love finding cute cupcake liners, but I hate it when they blend in with the cupcake after I pull them out of the oven. You know what I mean? So, in an effort to find cupcake papers that don't fade in the oven, I found these darling cupcake papers at Fancy Flours and... oh my! I'm in love! To use them, you cook your cupcakes with ordinary [cheap] cupcake liners and then you wrap these cupcake papers around your cupcakes when you are done decorating. So cute, right?


Unfortunately, these little cupcake papers can be a bit pricey... so I made up my own template, which you can download here. Making my own is so much more fun, because I can use any paper I want (not to mention the fact that I am saving money)!


To make your own cupcake papers, all you have to do is:

1. Download and print off the template

2. Trace the template onto cute paper

3. Secure it together with a little hot glue

4. Place your delicious cupcake inside

This adorable cupcake was decorated using the cupcake paper template:


The Lovely Paper Blog is about all things paper! It is also a creative journal in cahoots with The Lovely Paper Shop website where we design and print custom wedding invitations, baby announcements, and personal stationery.


See something you like? Print it. Share it. Email it. But please, link back here when you do.

Cupcake Carnival: 13 Reasons I Will Not Be Attending a 12-Step Program

Hello, My name is Christy, and I’m a cupcake-a-holic.
Admitting I have a problem is as far as I’m going to go in the 12 step process. I have no interest in the other 11, and I have 13 cupcake links from my blog …from glitter to gumdrops to justify my unwillingness to be a part of any 12-step cupcake addiction program (do you sense denial?!?).
I wish I could tell you it was difficult to find 13 links to share….the only difficult part was weeding through all my cupcake adventures.
I WISH I could tell you I don’t have more than 13 cupcake ideas written down I plan to try…this month.
I wish I could tell you I have an amazing metabolism, and I run marathons. :insert hysterical laughing here:
How about I just tell you the thirteen excuses....I mean reasons I have for loving cupcakes more than dieting?!?!
*Links are attached to each number for recipes, step-by-steps, and sources I gathered ideas from for each post.
1. I love cupcakes, because even insects look cute buzzing around these little beast...I wish I could say the same about my hips and cupcakes!

LEMON HONEY CUPCAKES

2. I love cupcakes because they can improve the un-improvable...I didn't know I could love anything more than a Samoa cookie...until I discovered this....

SAMOA COOKIE CUPCAKE

3. I love cupcakes b/c they come in all sizes....from mini to GIANT....

CUPCAKE CAKE

4. I love cupcakes b/c you can wear them....I make dresses, and Jon-Jons for all my friend's kiddos on their first birthday...to match their cupcake cake (above).

CUPCAKE DRESS

5. I love cupcakes because you don't have to confine them to the dessert menu.

PIMENTO CHEESE CUPCAKES

6. I love cupcakes because you don't have to confine them to the HUMAN race!

PUPCAKE: A CUPCAKE FOR THE PUP

7. I love cupcakes b/c they can wear disguises.

TV DINNER CUPCAKES

8. I love cupcakes because you can disguise them as a drink.

MARGARITA CUPCAKE

9. I love cupcakes b/c you can disguise them as pie.

APPLE PIE CUPCAKE

10. I love cupcakes because when you give up candy for lent, you can make a candy cupcake....maybe I shouldn't be confessing that here....maybe I need to go to church a little earlier this Sunday and think about this a little further....

PEANUT BUTTER CUP CUPCAKE

11. I love cupcakes because you can serve them in jars...and I love jars almost as much as I love cupcakes...

CUPCAKE IN A JAR

12. I love cupcakes because you can link them with the second best dessert ever...the cookie.

COOKIE MONSTER CUPCAKES

13. I love cupcakes because they helped me fulfill my Mom's prediction for my life....I think she always suspected I'd run away and join a traveling carnival someday.
cupcakes

Thanks, Kimberly, for letting me hang out with other carnies, and cupcake addicts! I guess this post makes me an enabler, but what a fun addiction to pursue…and nobody gets hurt….assuming you stay away from the scale, right?

Tuesday, June 22, 2010

Cupcake Carnival: Cassie from Cakes by Cassie

Hi there! I'm Cassie from Cakes By Cassie. I'm so thrilled to be a part of Cupcake Week! I bake and decorate cakes, cookies, and cupcakes for a living. I also recently started teaching classes here in my hometown of Chandler, Arizona. I also love to craft, sew, scrapbook, and do fun things with my two beautiful little girls. I am very excited to share with you a fun and really easy project that YOU can do at home. Have you seen these? They are called cupcake bouquets. They're soooo cute!


Here's what you need:

12 to 15 mini cupcakes (or 20 if you can't stop eating them, like me)

Buttercream Icing - I will include my delicious recipe at the end of the post

Flower Pot or other container

Styrofoam ball

Dried Beans

Sprinkles or any other decoration - Michael's and JoAnn's have really cute ready-made flowers and royal icing decorations for you non-decorators out there!

Tissue Paper


and.....

Toothpicks (Sorry, toothpicks! I forgot you in the picture above!)


One important thing:

The styrofoam ball needs to fit real snug inside the flower pot or other container.


I iced my cupcakes and just sprinkled some sanding sugar over the top. This is something real simple that anyone can do. You can get fancy and decorate them with flowers or use a decorating tip to swirl your icing in a fun shape.


Important:

PUT YOUR CUPCAKES IN THE FREEZER. They must be very well chilled to assemble.


In the meantime...........

prepare your pot or container.

Weigh your container/pot down with dried beans.


Cover the styrofoam ball with tissue and stuff it tightly into the container.


I use 2 toothpicks per cupcake. So, starting on the bottom, put 2 toothpicks next to one another halfway into the styrofoam.


Stick your VERY WELL CHILLED cupcake onto the toothpicks.


Continue around the bottom and fill the entire styrofoam with your cupcakes. I realized that I wasn't going to have enough cupcakes to cover my styrofoam with the July 4th container, so I switched to a smaller pot and styrofoam. Woops! Sorry about that.

Add some ribbon around the outside. Or maybe rafia? Or paint the pots, or decoupage.... or something different!


This is one of my favorites. I had my 3 year old paint flowerpots and I assembled the bouquet in them.


I love the bright colors on these ones!


I'd love to see pictures of your bouquets! And check out my blog.... Cakes By Cassie. If you are in my area come join me for a class! I will have my online shop up and running soon. Look through my galleries for ideas. And try my buttercream recipe.... it's to die for!


Cassie's Yummy Buttercream

2 1/2 sticks unsalted butter
6 Tablespoons solid white vegetable shortening
about 1/4 cup milk
2 Tablespoons Mexican Vanilla
10 cups C&H Brand Powdered Sugar (or another brand, well sifted)


Cream butter and shortening. Add milk and vanilla. Slowly add powdered sugar. You may need to add more milk to thin the icing down, or more powdered sugar to stiffen it. It needs to be a good spreading consistency; amounts differ from region to region.

Store in refrigerator for up to one week. Let sit at room temperature to soften before using. Icing can also be frozen for up to 3 months.
Photobucket


See something you like? Print it. Share it. Email it. But please, link back here when you do.
LinkWithin

Related Posts with Thumbnails