Wednesday, September 8, 2010

Subway Art Tutorial

There are tons of tutorials on how to make subway art out in Blog Land, even some that don't use a Cricut. I'll offer my humble tutorial, just in case it makes someone else's efforts easier.


What You'll Need
Canvas
White Spray Paint
Black Spray Paint
Ruler
Painter's Tape
Pencil
Contact Paper
Cricut
Cricut Cartridge

Step 1 - Spray a layer of white spray paint on your canvas. Yes, the canvas is white, but sometimes the canvas may be slightly dingy or it might yellow over time. So I spray mine white.


Step 2 - I lay out my canvas before I start cutting on the computer or on paper. This is only to help me get an idea of how I want things to look. In this case, it was to see how everything would fit. It's not exact, mostly because I can't control my Cricut to that extent. (However, I think with my new Silhouette I can.)
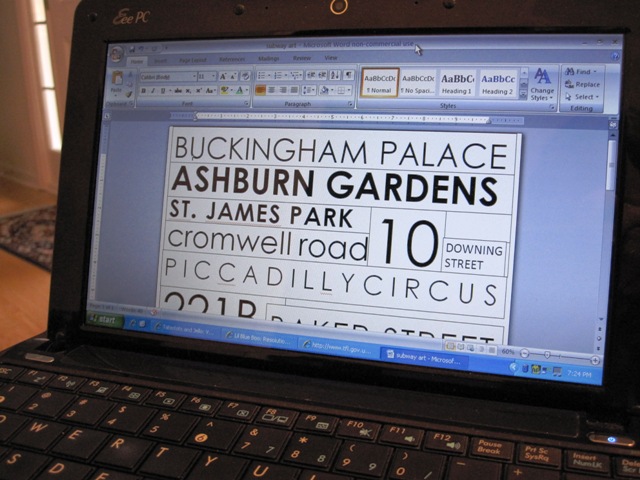

Step 3 - With Cricut, I can tell it a length I need to fit. It then tells me how tall each letter will be. If I don't want one that tall, or if I'm looking for something shorter, I just told it how tall to make everything. It sometimes takes a few cuts on bigger or longer words to get everything right. Just be patient, it'll all fit soon.


Using the contact paper, cut out a few lines at a time. This will help you with lining everything up.


Step 4 - I put down a half-inch border around the edge of the canvas. This helped me keep a "frame" of sorts. We didn't do this with the Melbourne canvas, and it looked just as good. This is an optional step.


Step 5 - Measure the height of your first line. In this case, I think it was 1 3/4". So I measured down 1 3/4" from the bottom of the "frame" and marked a few lines. Then put down painter's tape to give yourself a straight line. Peel off the non-sticky backing from the contact paper and stick the letters to the canvas.


Step 6 - Time to lay down another line! I chose to keep about a 1/2" between each line of text. You can do more or less, depending on what you want. So, to do this, I added half an inch to the height of the letters from the next line. For example, if the letters are one inch tall. I'd measure down 1 1/2" and lay the painter's tape at 1 1/2". Then sit the letters just on top of the painter's tape. Repeat for every line.


Use a variety of sizes, thickness, uppercase, lowercase, etc. There are lots of examples, like at Tatertots and Jello's Subway Art Party.


Step 7 - When you've finished all your lines, it's important you firmly press all the letters to the board. This helps keep spray paint from getting under the contact paper.

Step 8 - Now, the fun begins! Spray Paint!! Spray a light layer of black (or whatever dark color you want) over the canvas.


Step 9 - Wait a few minutes and do another coat. Then a few more minutes and another coat. The paint can will probably recommend 15 minutes between layers. I don't recommend that. Why? Because those letters may start to curl and you'll get black paint on your white letters. It only took me three coats to completely cover.

Just a quick note - more layers aren't better. The black paint may start to seep under your letters if the paint gets too thick. So, stop yourself once you've covered the canvas. Even if the paint looks uneven. If you can tell it's fully painted black, stop. Sometimes the paint plays tricks on your eyes. :)


This is that curling action I was talking about.


Step 10 - Let your canvas dry overnight. (Or at least several hours.) Then gently peel up each of the letters.


This is that under-the-letter action I was talking about. It's okay. Since you spray painted the canvas white before you put anything on it, you can get a little white acrylic paint and touch it up. No one will know the difference. Miracles.


And you're done! Aren't you soooo proud of it???


Now, show it off. Brag to your friends. And when they ask you to help them make one, do it. :) You're a pro at this now!



See something you like? Print it. Share it. Email it. But please, link back here when you do.

Tuesday, September 7, 2010

Muy Bien Melbourne!

My friend Megan just returned from a year and a half in Melbourne, Australia. She was studying, traveling, exploring, earning her master's degree, even camping out in the wilderness. So, naturally, she wanted something to remind her of Melbourne. I loaded up and headed to Mississippi for the weekend a while back, and we set out to create a piece of art. Here's what we did.


Tomorrow, I'll have a tutorial for this kind of subway art.

And I CANNOT wait for you to see my newest project. I'll reveal it Thursday. I'm positively giddy over it!!!
Photobucket

Monday, September 6, 2010

London Love Subway Art

I love subway art.

There, it's out. Phew! I feel better.

I was a little leery of it at first because 1) I wasn't sure if I would like it in my own house and 2) I wasn't sure I could pull it off.

But I did it. Because I love London. LOVE. (You may have also seen the Auburn art last week. I love Auburn, too.)

Side note: In this case, wouldn't it be called tube art? Since there is no subway; it's called the Tube or Underground. So maybe it's Underground Art.

Nahh... We'll stick with subway.

Instead of generally generic London streets, I chose to go with streets and addresses that meant something to me while I lived there - where I lived, where I interned, the roads I traveled most often.


Have you done subway art yet? I'd love to see it! Share a link in the comments.

Also - tomorrow, I'll have pictures of one I helped a friend do with streets and places in Melbourne, Australia. She just returned from a year and a half over there.

And on Wednesday - a tutorial!
Photobucket


See something you like? Print it. Share it. Email it. But please, link back here when you do.

Friday, September 3, 2010

A Cush for Your Tush

I'm on a vacation of sorts, you see. I'm at my parents' house in north Alabama, hanging out for the next week. I'm doing some cleaning, some throwing-away-of-stuff, some organizing. I'm helping out by cooking a meal here and there, helping my brother with homework, etc. Being an all-around awesome daughter.

Now how have my parents rewarded me?

Bang. Bang. CLANK. BANG. WHOMP!

That is the sound of our patio cover being built - at 9 in the morning. You may think 9 a.m. is late in the morning, and you'd be wrong. Especially when you're on vacation - even if there isn't an ocean shore to be found.

Even the cat doesn't get it. She gives me these, "What is going on?!" looks every once in a while.

I'm waiting for a 2-by-4 to go through the glass in the French doors. That'll be lovely.


And here's today's football project... :) I'm going to my first football game of the season tonight! I'm so excited! GO WILDCATS!

I'm certain most of you have one of these around. (I even found one of my high school's in a Goodwill in Birmingham the other day. Kind of crazy.) Businesses or schools give out these seats for free - good advertisement, I suppose.

Well, I'm not a fan. At least, not when I can come up with a way to cover them. :)


There you have it - a slip cover for your stadium seat!

It's got a handle to carry it. It's even long enough you could almost put it on your arm if you need to.


And check this - PIPING! That's a first for me. And I'm so happy with how it turned out!


Now - who's ready for some football??? :)


Anyone want a tutorial?
Photobucket


Texas Monkey

See something you like? Print it. Share it. Email it. But please, link back here when you do.

Thursday, September 2, 2010

Band Mom Bag

I know, I know. That last post wasn't about football, and I promised all football posts this week.

So here's my penance.

This isn't 100 percent football, but if you've ever been in the marching band or have a kid in it (or if you're just smart), you know that football isn't football without a marching band.

And because my mom is one, I present the Band Mom Bag.


I'm probably going to add an extra layer of nerd and cut out the letters "BAND MOM" and paint those on too. I'll post a new picture if I do.

Black and gold are my high school's colors, and because the music symbols are painted on at the very last step, this could very easily make a great football mom bag, basketball, baseball, cheerleader - or just a fan bag!

It's really easy to make, and I'll have a tutorial up in a few days. Just as soon as I upload and edit all the pictures.

Photobucket


See something you like? Print it. Share it. Email it. But please, link back here when you do.

Sawesome September!

Can you believe it's September?

My to do list was barely just begun!

Here's what I told myself to do in August - and how well I did or didn't do.

Things for Kimberly
- Read a whole book. errrr.... I'm going to stop making this a goal.
- Watch two new movies. Favorite: I Love You, Man (not a high-hitting movie by any means)
- Plan out fall weekends. (For some reason, they're totally crazy.) Planned out through the end of this month.
- Work out more often. (How's that for indecisiveness?) ehhh...
- Figure out Birthday Weekend getaway.

Crafting
- Finish summer wreath. It's here.
- Make large garment bag.
- Make Bible cover. Just haven't posted it yet.
- Find/make art for kitchen. Know what I want to do... Just have to do it.
- Make marker/crayon roll.

Gardening
- Throw everything into a garbage bag, and admit to the fact I'm never going to be a gardener. At least not when all I can use are giant pots.

Fooding
- two new recipes.
- Go to farmer's market.
- Try a new restaurant. Zea was delicious!
- Make something with my new food processor. Yummy salsa!

Home
- Organize front closet. uhhhh....
- Organize and donate clothes. errrr....
- Look for buffet or sideboard for dining room area. ehhhh....
- Research recovering and refoaming couch. hmmmm.....

Around Town
- Attend a baseball game. Go Braves (and corn dogs)!!
- Go to a new store.
- Visit a community event.

Family
- Help parents get organized at home. (School is about to start back.) I'm at home right now, about to start to work on my Honey Do list.
- Start work on Little Brother's Halloween costume. (His marching band wears costumes for a Halloween show. Yes, he's 18 and dressing up for Halloween.)
- Make some Christmas gifts.
- Finish and mail cousins' graduation presents. I'm a failure.


What's on Tap for September? It's going to be a busy month, but since it's starting with a vacation of sorts, surely it's going to be productive.

Things for Kimberly
- Read some. :)
- Go to the movies for a night out.
- No. More. Mountain. Dew.
- Get/give myself a pedicure.

Crafting
- Make kitchen art.
- Make entry way art.
- Sew my very first purse.
- Sew some pajama pants.
- Make a marker roll.

Fooding
- Make two new recipes.
- Try a new vegetable.
- Visit a new restaurant.
- Do some cooking activity you're scared of. (Probably heating sugar.)

Home
- Clean, organize, and decorate desk area.
- Make a craft cabinet in which I can hide all my craft supplies.
- Clean apartment since roomie has been the only one doing it for a while. :)

Around Town
- Attend Greek Food Festival.
- Visit Alma Mater and take some pictures for art.
- Visit a new antiques or flea mall.

Family
- Go home for little brother's homecoming football game.
- Get together things for parents garage sale.
- Help little brother with math project.
- Finally finish and mail cousin's graduation present.
- Have dinner with cousin and his new fiancee.

Whew... Let's get to work!!!
Photobucket


See something you like? Print it. Share it. Email it. But please, link back here when you do.

Wednesday, September 1, 2010

Football Oreos

Okay, it's not a craft. Or anything I made. But I love them just the same! Oreo has come out with football-shaped cookies! For real!


Guess who's going to make cupcakes and use these as a topper?


I told myself to put them back in the Oreo container as soon as I finished the pictures.


But I didn't...


I ate them. All of them. :)


See something you like? Print it. Share it. Email it. But please, link back here when you do.

LinkWithin

Related Posts with Thumbnails