Wednesday, March 24, 2010

Hoppy Easter Banner

I should first apologize for the quality of these pictures. I made this banner late last night and just snapped a few photos with my phone this morning. So they're not the greatest. I'll try to get some better ones tonight. Also, let's make a pact right now to ignore messy countertops. I'll ignore any you might ever post if you ignore mine. :) (And thank you!)


It's a Cricut project, of course. I used Designer's Calendar for the scalloped-edge rectangles and regular rectangles, as well as the Easter egg that is between the words "Hoppy" and "Easter." [I tried to take a picture of the detail on the egg, but my phone wouldn't upload it to my computer. (Problems, problems.)]

I used Cuttin' Up in the Serif feature for the letters. And I just free-handed the Peeps-style bunnies. (I got the idea for those from Made. Her banner is too cute for words. I mean, I'm speechless.)

What other fun Easter banners have you seen lately?

Tuesday, March 23, 2010

Plaid Shirt Eggs Tutorial

Here's a quick tutorial for the Eddie Ross-inspired Plaid Shirt Easter Eggs I posted yesterday.

What You'll Need
Plaid shirts
An Easter basket of your choosing
Glue or Mod Podge
Scissors
Plastic or paper mâché easter eggs

I found these plaid shirts at my local Goodwill for about $3 each. And considering I used very, very little of them to complete the eggs, they are definitely going to last me another craft or two. The eggs are from Hobby Lobby. I found a pack of 6 medium-sized eggs for 67 cents and a pack of 12 smaller eggs for 67 cents. (This worked out to be a very inexpensive project.)


I cut them into strips and then steamed them to get out any wrinkles. During the middle of the steaming, I realized I could have ironed the shirts first, but then they could have wrinkled when they were in the pile. So do this step however you want (or not at all). :)


Then with glue or Mod Podge, put some adhesive either on the egg or on the strip of fabric. I found (after like the third egg) that it was easier to put it on the strip of fabric. I also began using my finger to spread out the glue, just to make sure all the edges stuck well.


After I started wrapping around this egg horizontally (and in all directions), I realized I actually wanted to go vertically with the two ends of the strip meeting at the bottom of the egg. This creates a much cleaner-looking egg. So here's what the first strip looks like.


And the finished product...


Repeat the process over and over (and over and over) again until all the eggs you want covered are.


Monday, March 22, 2010

Plaid Shirt Eggs

It seems I haven't had a moment to catch up from Miami (sorry, Jill!). Work has been a bit crazy. (I'm working on a big project that I can't wait to share with you all in the future!)

Alas, I found a few free crafting moments this weekend, so hopefully I can get back into the swing of things and keep sharing my ideas, discovering what you guys are doing and all around enjoy this whole being-a-blogger thing again.

Do you all remember the plaid shirt ornaments Eddie Ross did for Kathie Lee's home? Adorable, right? Well I loved the idea too much to wait for Christmas again. So what did I do?

Plaid Shirt Easter Eggs, of course!


I think I need a few more, maybe solid white ones, to fill in the basket. But it's a great start, I think!

Click here for my quick tutorial. (Or just check out how Eddie Ross did it, because he is better at explaining it.)


-- Check out the right side of the screen to see where I'm blog partying today. And come join us! --

Wednesday, March 17, 2010

Easy Easter Eats

Today is St. Patrick's Day, so of course you're wearing your green, right? Good! If not, hurry up - print these, cut one out and tape it to ya!

I haven't caught up on reading blogs and thanking everyone who has stopped by. I promise I will -- just as soon as work calms down some.

I've got some great ideas for Easter and spring, but I just haven't had a free moment to wrap them up. (Anyone else know this feeling?)

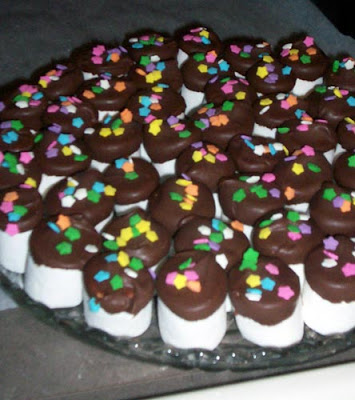
So for now, I've got an easy (and totally yummy) project to share. I made these a few weeks back for a friend's going-away event. They were so much cuter than I imagined, and they were sooo much easier than I had hoped. I borrowed the idea from Kraft's web site. Check out the original here.


What You'll Need
large puffed marshmallows
dipping chocolate (I used Dolci frutta because I've found it hardens well unlike some others)
adorable sprinkles (emphasis on the word adorable!)

What You'll Do
- Open the bag of marshmallows. Avoid eating 15 of them like I did.

- Melt the chocolate.
- Dip each marshmallow into the melted chocolate.
- Drop your sprinkles on while the chocolate is still melted. Or dip the end into a bowl of sprinkles.
- Let cool/harden and enjoy!


You could always slide them onto a sucker stick, add fruit, do multiple marshmallows on a larger stick. Be creative! Have you ever done anything like this? I've seen it around before in a few different forms. I'd love to share with others if you have done something like this.

Back to work on the projects. I hope I get to share something fun and Easter-y soon!


Monday, March 15, 2010

Miami - Better late than never

First, my apologies. I had a busy weekend and forgot to post these pictures on Friday.

But here they are!! I was attending the American Academy of Dermatology's Annual Meeting in Miami Beach. I'm not a dermatologist or a resident; I am, in fact, a member of the press, so my attendance there was only to get information for future issues of the magazine and enjoy all the fun classes. They were long, 8-6 days, but to do it while in Miami Beach - totally worth it!

We stayed at the Loews Miami Beach. Let me just say - the best part of the trip by far! The staff were just unbelievably nice. The room and bed were incredible. The restaurants were delicious. I couldn't stay out of the ice cream shoppe. It was in the middle of everything in Miami Beach, so I could walk to some of the yummiest taco places for dinner. Totally recommend any and all Loews hotels if you're ever traveling where there is one. I see they're opening one in Atlanta this year. I might have to make an excuse to stay there.

On Monday, instead of working a whole day, I took some time to go to the Elemis Spa which is on the grounds at Loews Miami Beach. I got a pedicure and relaxed in their steam room and calming lounge. I could totally do that every day.

It wasn't the break from freezing temps I was hoping for. Well, it was warm in the sun but chilly in the shade, so I never ventured into the water - pool or ocean. But still, it was a welcomed change.

So here are some pictures - and soon, back to some more fun crafts and projects!

Enjoy!
Kimberly


Thursday, March 11, 2010

Returns from Miami

I've finally made it back from Miami and am starting to settle in. I've got to catch up on all the comments and posts you guys have made since I've been gone. That'll probably take me all weekend, but I'm excited to explore!!!

Pictures of the trip coming tomorrow!

Wednesday, March 10, 2010

Kiss Me Frames

Cricut cut-outs. Dollar store frames. Glue. Paper. That's it.


I cut white cardstock to fit two 4 by 6 frames I purchased at Goodwill. Then I cut out "KISS ME IM IRISH" on my Cricut. (Cartridge: Cuttin' Up. Size: 1 3/4") And I cut a shamrock. (Cartridge: Designer Calendar. Size: 3")


I glued them to the cardstock, let them dry and put them in their frames. And here they are.


This was a total of about $4.50. Post-St. Patrick's, I'm sure I'll paint these frames a different color. But for St. Patrick's, everyone likes a little gold. :)


See where I'm partying on the right side of the blog. And come join us!

LinkWithin

Related Posts with Thumbnails