What's peace week without tie-dye shirts? My favorite thing bout tie-dye shirts: no two are ever the same. Ever. Like try. You can never make two the exact same.


You've probably seen all the tie-dye kits in craft stores and supermarkets. You can buy those. I'm sure they work. But I have a secret weapon in my tie-dye shirt making. And here it is.... Shhh....

It's airbrush paint! Yeah, airbrush paint! Like the paint airbrush artists use on those crazy boardwalk/beach shirts we all have.
Admit it. You have one (or three). And I bet they have your name on it. And maybe your best friend's name. Or your spouse's. I know you do.
I do... :)
Okay, so here's why I like these paints better than kits. 1) You can pick whatever colors you want. Most kits come with pre-determined colors. Boo. 2) This paint goes a long, long, long way. I painted five shirts and a bag and still had almost all of the paint I mixed up in the beginning.
And here's what you do to make your own.
What You'll Need
100% cotton t-shirts
Water
Airbrush paint
Glass jars
Inexpensive brushes
Rubber bands
Disposable gloves
Old clothes
Styrofoam plates
Clothes line (or place to hang up shirts)
Plastic garbage bags
The disposable gloves are to prevent staining your skin. Because trust me--it takes a while to wash this paint off. Which reminds me - wear old clothes with this project.
Pour about a 1/2 cup of water into a mason jar or glass cup. (Baby food jars are great for this! You can do plastic cups if you want, but I keep the paint I mix up for other tie-dye, so I use glass.) Then pour about a tablespoon of color into the water, and mix well. When you begin painting your shirts, feel free to add more paint until you get the color you want. The more paint, the richer the color.

Now here's where you get to determine your tie-dye pattern. If you Google how to tie-dye, you'll run across tons and tons of tutorials. But I'll offer my quick (and humble) tutorial.
You'll see we did this outside. That's because I'm great at ruining things, so I wanted to prevent as much damage as possible.
1) Soak your shirt in water. Cool water is fine. Then squeeze all the water out, as best you can, and lay out your shirt on a flat surface.

2) Pinch together the center of your shirt (or off center if you want that look) and twist the shirt clockwise.

3) Continue twisting the shirt clockwise, wrapping the sleeves and longer sides up as you go.
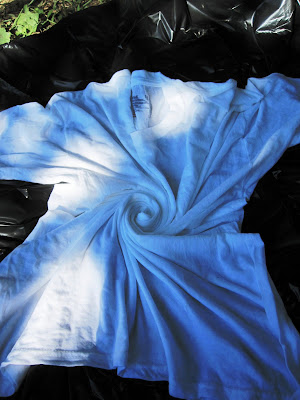
Wrap until you have this cinnamon-bun-looking finished product.

4) Divide the shirt into quarters by sliding rubber bands over the shirt like so. The center of your shirt--where you pinched originally--is at the very center of the intersecting rubber bands.

5) Then paint!
This style of tie dye is great for kids because they have four "sections" to work with. They can do like I did and color two of the quarters one color and the other two quarters another color. Each quarter can be a different color, or whatever their creative little hearts desire.
You want to get a lot of paint on your shirt. I didn't get as much on this one as I should have (see finished shirt), so there is a lot of white. If you like that look, great! If not, just add some more paint.
When you paint one side, don't forget to flip the rolled-up shirt over and paint the other side.


6) Let the shirt sit for about 10 minutes. Then remove the rubber bands and unwrap. Ta-da! Somewhere a hippie got her wings.
7) Be sure to lay the shirt flat to dry for about 45 minutes (to keep the colors from running). Then you can hang it up on a clothes line to completely dry.

8) Before you wear this shirt, you'll want to wash it to remove any excess color. Each person has a different style on the first wash. I just throw mine straight into the washing machine (by itself so I don't risk ruining anything else) after it's completely dry. Others first run water over the shirt before washing. So I'm not much help here.
This is called the concentric circles pattern. You can start your center circle anywhere you want on your shirt, and it'll still be awesome!
1) Follow step 1 from above--wet the shirt and squeeze out all the water. Then lay out the shirt on a flat surface.
2) Decide where you want the center of your tie dye to be. In this case, it's in the center of the shirt. Pinch the shirt at that point, and pull it up, off the ground.
3) Wrap rubber bands around the shirt, starting just below the tip--which will be the center of your shirt. Continue wrapping rubber bands around the shirt at various distances from one another. Be sure to wrap the rubber bands as tightly as you can, as this is what makes the "lines" between each ring.

4) Then paint! Again, put a lot of paint on the shirt. Your goal isn't to saturate the shirt, but you're doing more than just coloring the top part of the shirt. You really want it to soak through the layers.

5) When you've painted all your rings, let the shirt sit for 10 minutes. Then unwrap the rubber bands and unroll the shirt. (You may have to use scissors to cut some of the rubber bands. We did.)

Then follow steps 7 and 8 from above--laying out the shirt to dry, then hanging it up to completely dry.
So there you go, tie dye the attempting creative way!
Have you ever tie dyed?

See something you like? Print it. Share it. Email it. But please, link back here when you do.