Showing posts with label comfort food. Show all posts

Wednesday, May 26, 2010

Scrumptious Squash

From the beautiful squash I purchased this weekend at the farmers' market, I whipped up a delicious squash casserole that is sure to please even the pickiest eaters. (Then again - I love squash, so you don't have to ask me twice to eat it.)

What You'll Need
3 pounds yellow squash (about 5 large squash), sliced
3 Tablespoons butter, divided
1 small onion, chopped
1 cup shredded sharp Cheddar cheese
2 large eggs, slightly beaten
4 tablespoons (or 1/4 cup) mayonnaise
2 teaspoons sugar
1 teaspoon salt
15 Ritz crackers, crushed

How You'll Cook This Casserole
1. Preheat your oven to 350°. Lightly grease or butter an 11" x 7" pan.

2. Fill a large skillet about half-way with water and bring to a boil. Cook sliced squash in boiling water until the slices are just tender, or about 8 to 10 minutes. When the squash is finished, drain it well, and gently press between paper towels. (This is to remove the extra moisture since squash holds water well.)


3. Melt two tablespoons butter in a skillet. Add onion, and saute until the onions are tender. Remove the skillet from the stove's heat.


4. Stir in squash, cheese, eggs, mayonnaise, sugar, and salt. Spread squash mixture into your pan.


5. Melt remaining 1 tablespoon butter in microwave-safe bowl. Then stir together the melted butter and crushed Ritz crackers.


6. Sprinkle butter-Ritz mixture evenly over the top of the casserole. Bake for 30 to 35 minutes or until the center of the casserole is set. Then enjoy!


A unique find while doing this recipe - Ritz Fresh Stacks! Have you ever opened a pack of crackers, eaten half of them, and then folded it up only to come back a day or two later and realize it opened, and the crackers are now as stale as packing peanuts? Totally guilty! And such a bummer!


I have major guilt buying large boxes of Ritz crackers (or any other cracker, for that matter). I just can't eat all the crackers before they become too stale.

That's why stumbling across the Ritz Fresh Stacks completely made my day. It's a pack of 8 rolls, with each roll having only 15 crackers. It is perfect for cooking, or snacking. (Portion control!)

Do you have any family-favorite veggie meals you look forward to cooking during summer's bounty?

Friday, February 19, 2010

Pizza Pasta

This is an oh-so-fun, kid-friendly spin on pizza and pasta (two of my favorite things). You can mix and match any of the "toppings" for whatever your family likes. If you try this, let me know what you used. I'd love to try other ideas.


Ingredients
1 (12-ounce) package penne pasta
1 small onion, chopped
1 (14 ounce) jar pizza sauce
1 (8 ounce) can tomato sauce
1 (3 1/4 ounce) package sliced pepperoni, cut in half
1/2 cup sliced fresh mushrooms
1 small can sliced black olives
1 1/2 cup shredded mozzarella cheese

What You'll Do
- Bring a large pot of (lightly) salted water to a boil. Stir in pasta and cook until pasta is al dente. Drain.


- In a skillet over medium heat, cook the onions until tender.

- In a large bowl, mix the pizza sauce and tomato sauce. Stir in the onion, pepperoni, mushrooms, olives, and 1/2 cup of mozzarella cheese. Gently mix in the cooked pasta until pasta is evenly coated. Transfer to the prepared baking dish.

- Cover with aluminium and bake 30 minutes.

- Remove aluminium, top with remaining 1 cup cheese and bake for 15 minutes or until cheese is melted.

I'm joining this blog party today...

Blessed with Grace

Monday, February 15, 2010

Mac & Cheese

Have you ever met a person who doesn't like macaroni and cheese? No? In some form, macaroni and cheese is just one of those dishes we all love, or at least like. a whole lot.

So in an effort to expand my mac 'n' cheese horizons (away from the boxed kind), I tried this recipe. And I love it. It's actually really easy to make and is sooo yummy.


Ingredients
3 1/4 teaspoons salt, divided
12 ounces strozzapreti or penne pasta
4 teaspoons all-purpose flour
1 1/2 cups milk, divided
2 cups finely shredded sharp cheddar cheese, divided
1/4 cup sliced green onions
1 teaspoon hot sauce
1/4 teaspoon pepper
2 slices center-cut bacon, cooked and crumbled
Cooking spray

Directions
1. Bring six quarts of water with 1 tablespoon of salt to a boil. Add pasta and cook until al dente. Drain pasta. Turn on your oven's broiler.

2. Combine flour and 1/2 cup milk in a medium-sized saucepan over medium heat. Once it's mixed, gradually add the remaining 1 cup of milk.

3. Bring to a boil and let it cook for one minute, stirring constantly.

4. Remove from heat. Let stand until the liquid cools to 155 degrees.


5. Stir in 1 1/2 cups cheese. Add 1/4 teaspoon salt, onions, hot sauce (I used Tabasco but feel free to use your favorite), pepper, and bacon and stir.

6. Add pasta and toss until well coated.


7. Spray a 2-quart broiler-safe dish with cooking spray. Spoon pasta into dish and top with remaining 1/2 cup cheese. Broil until cheese is melted as you like.

**I like mine a little crispy, so I left it about nine minutes.


Spoon out and enjoy! It's so yummy! Do you have any favorite macaroni and cheese recipes I should try?

Friday, February 5, 2010

Chicken Pot Pie, Please

In full disclosure, I should say up front -- I have had a life-long aversion to chicken pot pie. I can't trace it back to any traumatic experience, but I see it, and I just run.

So, in all efforts of being an adult and expanding my horizons, I made my very first chicken pot pie.


And it was good!!! I mean, it's not my most favorite thing I've ever eaten, but I'm not scared anymore. And the best part - it was easy!

So here, for you, Papaw Jimmy and Nanny Linda's Chicken Pot Pie...

Ingredients
6 chicken breasts
1 can peas and carrots, drained
4 hard-boiled eggs, chopped
1 medium onion, chopped
1 can cream of chicken soup
1 can cream of celery soup

Topping:
1 cup all-purpose flour
1 cup milk
3/4 cup mayonnaise


Directions
Preheat oven to 350 degrees Fahrenheit. Boil chicken; save broth. Cut chicken into bite-size pieces and layer in a 9-by-13-inch baking dish with peas, carrots, eggs, and onion. Mis oup and about 1/2 cup chicken broth to thin soup a little (enough to pour). Pour over chicken mixture.


Mix well flour, milk, and mayonnaise for topping. Mixture will be thin. (That's okay.) Pour over casserole. Bake for 1 hour.


Note: I put a cookie sheet on the oven rack below the casserole dish in the event any spilled over.

Let cool just a bit before serving. Enjoy!

Wednesday, February 3, 2010

West African Peanut Stew

The recipe's name may seem weird, but I promise - this is so delicious! I tried it for the first time a few years ago, and it's become one of my favorites. It's very unique, so try it with your family, and let me know what they think!


Ingredients
1 pound boneless, skinless chicken breasts
3 tablespoons all-purpose flour
1/2 tablespoon paprika
1/2 tablespoon onion powder
1 teaspoon salt
1 box Zatarain's New Orelans Style Jambalaya Mix
2 tablespoons vegetable oil
1 can (14.5 ounces) diced tomatoes with onion and pepper, undrained
1/2 pound sliced fully-cooked Polish or kielbasa sausage (if you like it)
2 tablespoons peanut butter
Salted peanuts for garnish


Directions
Cut chicken into large bite-size pieces. Combine all-purpose flour, paprika, onion powder, and salt. Roll pieces of chicken in flour mixture.

In a large saucepan, cook chicken pieces in vegetable oil until done; about 8 minutes. Be sure to flip chicken after about 5 minutes.


Stir in hot water, jambalaya mix, tomatoes and sausage. Heat to boiling, stirring occasionally.


Reduce heat; cover and simmer about 25 minutes, stirring once.

When rice is tender, stir in peanut butter. Cook about 2 minutes longer, mixing peanut butter well.

Cover; let stand about 5 minutes or until most of the liquid is absorbed. Serve in a bowl and top with peanuts.


Monday, February 1, 2010

Foodie February

Can you believe it's February 1st already? Have you seen all the fun things you can make for Valentine's Day? Have you been busy crafting for your sweetheart?

I have decided to dedicate [most of] February to... Food! I'm sure I'll pop up here and there with some other posts, but I have a few food ideas in my bag o' tricks, so I wanted to share those this month.

I hope you enjoy, and I can't wait to hear what you guys think!

So to start things off, one of my most favorite dishes... Poppy Seed Chicken!

It's super easy and total yum! It's a total crowd pleaser.

(Props to MyRecipes where I found this recipe online.)

Ingredients
3 cups chopped cooked chicken
1 (10 3/4-ounce) can cream of chicken soup, undiluted
1 (16-ounce) container sour cream
3 teaspoons poppy seeds
1 pack round buttery crackers (about 40 crackers), crushed
1/4 cup butter, melted

Directions
Cut raw chicken into bite-size pieces and cook.


Combine first four ingredients. Spoon mixture into lightly greased 11- by 7-inch baking dish.


Stir together crushed crackers and melted butter; sprinkle evenly over casserole.


Bake at 350° for 35 to 40 minutes or until hot and bubbly.


I'm joining these blog parties today...

Blessed with Grace

Tuesday, January 26, 2010

Red Velvet Sandwich Cookies

I've said it before, and I'll say it again. I love red velvet. And I love these cookies!


They're so fun and perfectly sweet for your Valentine's sweetie. Did you see what I did with them yesterday? Check it out here.

Ingredients
Red Velvet Cookies
(makes about a dozen cookies, more or less depending on size)
1 1/4 cup all-purpose flour
1 tablespoon cocoa powder
1/2 teaspoon salt
1/2 teaspoon baking soda
1/2 cup (or one stick) butter, at room temperature
3/4 cup sugar
1 egg
1 tablespoon red food coloring
1 teaspoon vanilla
1/2 cup buttermilk

Filling
1 (8 ounce) package cream cheese, room temperature
1 stick butter, room temperature
1 pound (one box) confectioner's sugar
1 teaspoon vanilla

Directions for the cookies
Preheat oven to 350 degrees Fahrenheit. Line two baking sheets with parchment paper. In a medium bowl, sift together flour, cocoa, baking soda and salt.

Using a mixer, cream butter with the granulated sugar until fluffy. (This takes about 4 minutes.) Add in the egg, food coloring and vanilla, and beat until well mixed. Beat in the flour mixture alternately with the buttermilk until smooth.

Place 1/4-cup (about 2 heaping spoonfuls) scoops of batter 2 inches apart on the prepared baking sheet. Spread the batter out with a butter knife in a cookie shape. They should not be completely flat. (See picture.)


Bake until a toothpick inserted in the center comes out clean, about 12 to 15 minutes. Let the cookies sit for 5 minutes, then transfer to a cooling rack.


Directions for the filling
Place stick of butter in small bowl on mixer and beat gently.

Divide cream cheese into three parts, and gradually add to butter. Mix well, but do not over beat.

Add sugar to the butter/cream cheese mixture gradually. Add vanilla. Mix gently.

Once cookies have cooled completely, flip cookies over and frost the underneath side of the cookie. Press two together, and there you have a delicious red velvet sandwich!

It's like nothing you've ever had before. Unless of course, you've had red velvet cake with cream cheese icing, and then it's just like it. :) Except a cookie!


See where I'm showing off this post...

Photobucket


DIY Day @ ASPTL


Blessed with Grace


Also sharing at Foodie Friday.

Monday, January 25, 2010

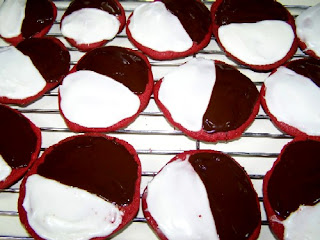
What's Black, White, and Red All Over?

Red velvet black and white cookies, of course!


Just in time for Valentine's Day... Quite possibly one of the most amazing creations. Ever. Give it up to Rachel Ray for this one! She's one smart... cookie! (cue drums.)

And keep this recipe handy as we have round two of red velvet cookies tomorrow. Can't wait to show you what I created!

Ingredients
Red Velvet Cookies
(makes about a dozen cookies, more or less depending on size)
1 1/4 cup all-purpose flour
1 tablespoon cocoa powder
1/2 teaspoon salt
1/2 teaspoon baking soda
1/2 cup (or one stick) butter, at room temperature
3/4 cup sugar
1 egg
1 tablespoon red food coloring
1 teaspoon vanilla
1/2 cup buttermilk


For Vanilla Glaze
2 cups powdered sugar
1 teaspoon light corn syrup
1/2 teaspoon vanilla extract
2 tablespoons hot water


For Chocolate Glaze
4 ounces (about a 1/2 cup) semi-sweet chocolate
3 tablespoons butter
1 tablespoon light corn syrup


Directions for the cookies
Preheat oven to 350 degrees Fahrenheit. Line two baking sheets with parchment paper. In a medium bowl, sift together flour, cocoa, baking soda and salt.

Using a mixer, cream butter with the granulated sugar until fluffy. (This takes about 4 minutes.) Add in the egg, food coloring and vanilla, and beat until well mixed. Beat in the flour mixture alternately with the buttermilk until smooth.

Place 1/4-cup (about 2 heaping spoonfuls) scoops of batter 2 inches apart on the prepared baking sheet. Spread the batter out with a butter knife in a cookie shape. They should not be completely flat (See picture.)


Bake until a toothpick inserted in the center comes out clean, about 12 to 15 minutes. Let the cookies sit for 5 minutes, then transfer to a cooling rack.


Directions for the glazes
In a bowl, whisk together the powdered sugar, vanilla, corn syrup and hot water, until smooth. If it's too thick to stir, add tiny amounts of hot water, but don't add too much or it will become runny. If it's too runny, add more powdered sugar to regain thickness.

In a seperate bowl, melt the butter and the chocolate in a microwave for about 1 minute. If it's still not melted, heat in 20-second increments until completely melted. Add the corn syrup and stir until smooth.

Once the cookies are cooled, face them all bottom side up (this way it's flat). Spread half of the cookie with vanilla glaze and the other half with chocolate glaze. Refrigerate for 20 minutes to set glazes. Then enjoy!


See where I'm showing off this post...

The Girl Creative

Making

LinkWithin

Related Posts with Thumbnails