Showing posts with label inexpensive. Show all posts

Tuesday, October 5, 2010

Spooky Art

Spray paint is a cure-all.

It covers everything. Makes mismatched items look like they belong together. And makes dollar-store frames art!


I took down the normal art in the entryway and replaced it with this (temporary) spooky art.


Total cost for this art project: About $13. Everything is either from the dollar store or the dollar bins at Target.


See something you like? Print it. Share it. Email it. But please, link back here when you do.

Wednesday, August 18, 2010

Summer Crush Wreath

My poor front door has been a little blank since the 4th of July. It reminds me every day when I came home --the blank wreath stares me down--that I should be more creative and get something done.

So I went on an inspiration mission. I love Piccadilly Peddlers Christmas wreath, and I plan to make something exactly like it for Christmas this year. Those "flowers" were like little light bulbs going off in my head.


Oh yeah, and I have a little tutorial here.

Photobucket


See something you like? Print it. Share it. Email it. But please, link back here when you do.

Tuesday, August 17, 2010

Bag, You're It! Tutorial

I am way late on this tutorial. But I have another project this week. Will that make up for my tardiness? (In full disclosure, my hometown has been suffering some flooding in recent hours, and my mind has been in other places.)

So here's the tutorial I promised.


First, you need your fabric. The black/white print is a home decor cotton fabric. The blue is a broadcloth (I think). You don't have to make the lining/reversible side. This was totally my call as I wanted a more finished look.

What You'll Need
1 yard of home decore cotton fabric
1 yard of liner fabric
Bone folder or utensil for pushing out corners
Iron
Fabric starch (optional)
Scissors
Pins
Sewing machine
Ruler
Yard stick
Disappearing ink pen


1) You need to cut your fabric.

Cut two pieces of the following:
- 20" by 21" in decor cotton (The top and bottom of the tote will be the 20" sides. This matters especially if you have a fabric with a nap or design.)
- 20" by 21" in lining fabric
- 5" by 26" in decor cotton for the handles
- 10" by 10" in decor cotton (for the pockets)
- 10" by 10" in lining fabric (for the pockets)


2) Make your pockets.

Now I made mine with black/white fabric on one side and the blue fabric on the other. You can make the combo for the pockets any way you want.

Press the right sides of the fabric together. Sew around all sides, using a 1/2-inch seam allowance. Be sure to leave a small (2 to 3 inches) opening for turning the pocket.


Clip the corners. Then turn the pocket right side out and push the corners out. (I use a bone folder.)

Press the pocket, making sure the seams are folded and the 2- to 3-inch opening is turned in. (Pressing it makes sewing easier.)


Topstitch 1 inch down on the side opposite the opening. This is the opening of the pocket, what will be the top of the pocket, the unattached side.


Repeat the same for the interior pocket if you've decided you want one.

3) Attach the pockets. Place the (now) 9" by 9" pocket on one of the 20" by 21" pieces (exterior fabric or interior fabric). Make sure the pocket top (where you topstitched one inch down) is lined up with the shorter 20" sides of the bag. Then pin the pocket in place.

Seam the three sides of the pocket in place using a 1/8-inch seam allowance. Be sure to secure the opening of the pocket as you're sewing. Double (or triple) stitch to secure the pocket well.


Repeat this step for the other pocket.


4) Sew main panels of outside and inside fabrics together.

Sew around all three sides, using an 1/4-inch seam allowance.

If you have a serger, serge the raw edges of the two sets of main panels together. If you don't, use a zig-zag seam. Since you'll be lining this bag, you don't have to worry about any unsightly raw edges. Yippee! You're just looking for extra hold.


5) Make the handles.

Press both 5" by 26" pieces. Then fold it in half and press again.

Then open the fold and fold in one side of the handle to meet in the crease of the previous fold. Repeat for the other side, and press to create a new crease.

Repeat this for the second handle.


With an 1/8-inch seam allowance, double or triple stitch along each long side of the handles. (Get as close as you can to the side without missing all the pieces.)

6) Make the gussets.

With the wrong sides still out, take one corner of the bag and open it.

Feel for the seams of both the bottom and side pieces, lining them up with your fingers. You want the seams to be in line with each other, then pin the gusset in place, making sure the seams on the bottom fold to the same side.


Measure 2 1/2" from the point and draw a line across. Sew (at least) a triple stitch along this line. You can cut off the extra material too.

Repeat these same steps for the other corner of this bag and for the corners of the liner.


(Now comes the part I hope I can remember...) :)

7) Put the handles in place.

With the tote still inside out, create a 1 1/2-inch hem along the top of the tote. To do this, fold down the raw edge 1/2 inch. Press with an iron, then fold down the hem another 1 1/2" and press again. Do the same for the lining.

Lay out the handle, being sure it's flat and ready to be attached.

Flip the inside fabric (the blue in this case) out, so the inside pocket is now on the outside. Slide the outside fabric (the black/white fabric in this case) into the inside fabric. Both wrong sides should now be touching.

Slide the inside fabric (the blue) under the 1 1/2" seam from the outside fabric.

Measure about five inches from each side of the tote, then tuck each handle under the hem. Pin in place, and repeat these handle-placement steps for the other side.

Triple stitch along the bottom of the fold (where the straps are tucked), then fold the handles up (like you are holding the bag) and hem the top. Be sure the straps are caught when you're sewing so they'll be most secure.


Then flip the bag whichever direction you want it (inside out or outside in or can you tell the difference?) And enjoy! (And enjoy making all the ones you'll want to make when you see how easy this great all-purpose bag is!)

Got any great bags you've made or seen lately? I'm looking for some new ones to try.


See something you like? Print it. Share it. Email it. But please, link back here when you do.

Friday, August 13, 2010

Bunting Tutorial

Does everyone know what I mean when I say "bunting?"


I know when I've mentioned it to my friends, I've gotten weird looks. It's bunting--triangle garland, string of flags, pennants, party string. Fun on a string. Pretty fabric triangles hanging from a string. Ringing any bells? (Upon investigating, "bunting" seems to be a fairly British term - which might explain why I know it as that.)


And here's how you make it. Sit tight--here come a lot of pictures!

What You'll Need
6 pieces of fabric - I bought a quarter yard each of six fabrics.
Quilt binding, bias tape, or twill tape
Ruler
Scissors or rotary cutter
Iron and ironing board
Sewing machine
Bone folder (or something to pop out point of triangle)
Pins

First, you need some fabric. I chose six coordinating fabrics, that's three sets of two. The green gingham goes with the pink plaid. The purple circles go with the light green polka dots. The yellow polka dots go with the multi-color stripe. If you do it this way, you get six patterns, so your string of flags will have six different flags before repeating.


Cut strips of fabric, about seven inches. It doesn't have to be perfect, and it doesn't have to be neat. We do all the necessary cleaning and trimming later.

Then iron the fabric.


Then iron the two right-sides of a set together. (This just helps keep things together and pressed evenly.)


If one end or side of the fabric is much longer than the other, trim them to get as close to a solid strip of fabric as possible.


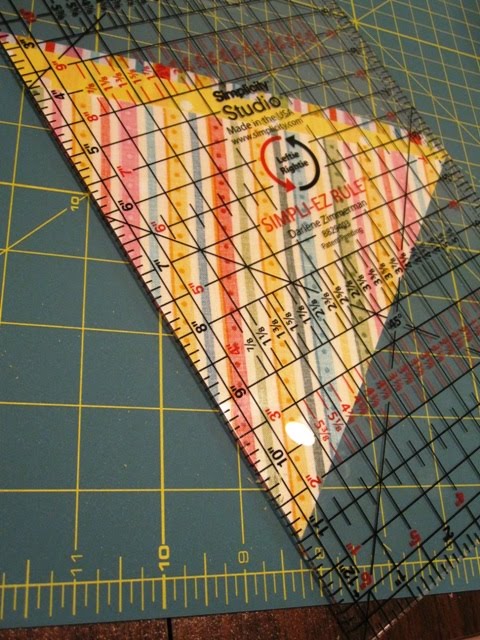
Now you need a triangle template. I just downloaded one from someone else (like here). You can make your own (like here). Or whatever you want to do. But from top to bottom, you'll want a flag that is about 6 inches long--remember your strip of fabric is around 7 inches.

Now it's time to cut. With each set of fabric together (right sides together), place the triangle with the top edge (the shortest edge) along the long edge of the fabric. Using scissors or a rotary cutter, cut out the fabric following the lines of the template. I used a quilt ruler to help keep a straight edge.


After you cut out the first triangle, flip it over on top of the large strip of fabric, and using your quilter's ruler and rotary cutter, make another slice. Then flip and cut, flip and cut until you reach the end.


Repeat the above steps with the other fabrics until you have all your triangles trimmed. (Though it doesn't look like it, the right sides are still together in the triangles below.)


Next, sew along the long edges of the triangles. You can sew them one at a time, stopping to clip and trim after each one. Or do like I did--and just sew one long line. Then when you're finished, clip and trim all at once.


Repeat on the second long side until all your triangles are sewn. (Do not sew the top--shorter--side. It stays open so you can flip your triangle out.)


Speaking of... flip all your triangles so the right sides are now out. Use the eraser tip of a pencil or a bone folder to poke out the point. Careful not to poke too hard. The fabric will rip--as I learned the hard way.


Next iron all the triangles flat. I actually first press on either side (where it's hemmed together) to help make the crease, then fold it and iron on the front and back.


Do each one until you get a beautiful stack like this! Ahhh... Take a moment to enjoy it.


Use bias tape, or quilt binding, or twill tape (or what else could you use?) to make your string. I used quilt binding because I had some extra I needed to use up. It's a bit wider than bias tape, so if you like a thinner string, go for it. Or just fold the quilt binding in half again. Either way.

I made two buntings that were each 3 yards long. Why three yards? That was the length of the quilt binding, so I went with that. Each string has about 15 triangles on it. You could do more or less depending on how close together you want them, how big they are, and how long your string is.


I laid the quilt binding in the floor (because I don't have a large work area, so the floor is easiest). Then with a yard stick, I set out each triangle with about an inch in between points. Do this all the way down the string, making sure the space between triangles look relatively even.


Slide the triangles under the folded quilt binding and pin in place. Before pinning them in place though, trim the top of the triangles if they're uneven or too messy.


Single stitch at the bottom of the quilt binding, removing pins as you go. Then single stitch along the top of the quilt binding for extra security.


Clean up and secure the ends by unfolding them, sewing along the end, folding it in half, and sewing it together. Don't forget to back stitch.


And there you have it! Your very own bunting - string of triangles - garland - summer string fun!


I ironed them one more time. It just helps even out all the wrinkles and bumps, especially in the top along the binding.


Have any of you made bunting before? How else do you use it?

Photobucket


See something you like? Print it. Share it. Email it. But please, link back here when you do.

LinkWithin

Related Posts with Thumbnails