Showing posts with label foodie february. Show all posts

Sunday, February 28, 2010

Mad About Mixing Bowl

Have you stumbled across MixingBowl.com yet? Did you know they also have a magazine?

I found the web site a few weeks back, but I didn't find a copy of the magazine until last weekend.

photo from my phone - apologies for the quality


Mixing Bowl is made by the same publishing group as Better Homes and Gardens. As a subscriber to many food magazines - Food Network Magazine, Cooking Light to name a few - I tend to gather lots of ideas... and then do nothing with them. You with me on that? But hey, I've got a lot of great ideas!

But MixingBowl.com is more than just a food web site. It's an entire community! And these people are amazing. Not only do they share recipes with each other (and with you), but they have forums and discussions and are so eager to help. I've asked a few questions, and within a few minutes, I've got tons of great help.

This great community spills over to the magazine, Mixing Bowl. So much of the material is member driven. For example, questions and answers from the Knowledge Bowl at MixingBowl.com end up in the magazine. Many of the features are inspired by groups on MixingBowl.com, and it looks like all the recipes come from members. Plus, they give great sidebar information. For example, with the chili feature, they give you a run-down of beans, what they're called, how to prepare them, what they're best with, etc. They do taste tests and let you know their favorite products -- in this magazine above, best salsas.

And none of it is intimidating to me -- unlike some others. I think I can genuinely cook everything in here, even things I've been scared to try like breads. Maybe that's because I know it's just people at home, making recipes, trying new things, and sharing their experiences -- just like me.

Saturday, February 27, 2010

Kimberly's Kitchen Favs

As we're closing out Foodie February, I wanted to share a few of my new favorite kitchen gadgets. Sometimes (and I'm only slightly ashamed to admit this), I wander the gadget section at Bed, Bath & Beyond for hours. I want all those gadgets. I don't know what they do, but I want them. Do you ever get that way?

These are my new favorite kitchen toys.


From a chef friend of mine - "It's great for quick salads or slicing veggies for a sandwich. It's very light weight, very sharp, holds its edge and hardly ever needs sharpening." Plus, it's pretty!

2. The Nuvem - or Round wire bread basket from Alessi

It's made of bundled - and then crushed - aluminum wire. And I can't get enough of it!

3. Remember my pot de créme experiment? I shared that I'm also slightly obsessed with making mini desserts (and well, mini dishes) of any kind, so of course you have to have ramekins. Loving this one...

Emile Henry Stackable Ramekin in Vert
It comes in Citron, Blanc, Nougat, Cerise, Figue, Sky, Azur, Black, Slate, and Sand. [Noticing a color fascination yet? :)]

4. Todd English Hard Anodized With Thermolon Frypans


Almost all my pans are from Todd English's HSN GreenPan Collection. They've never disappointed me. You can usually see them in my cooking photos. They're very sturdy, clean brilliantly and cook evenly. (My dad even cooks with these at their house, and he can ruin any pan. So far, these have lasted.)

5. Trivets or hot pads are a fun splash of color on my otherwise boring brown table. I really love these from Rebecca's Treasury.


So what are your favorite kitchen gadgets? What can you not live without when you're cooking or baking?

Thursday, February 25, 2010

I'm Dreaming of Cakes

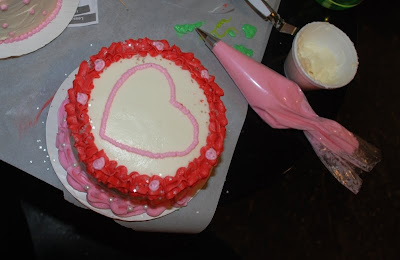
Recently, I attended a cake-decorating class at a local cupcake shop/corner of heaven/my weakness, Dreamcakes. It happened to fall right before Valentine's and my mom's birthday, so with the Valentine's colors, I made my mom's birthday cake. It was an event -- that's for sure! I'm not quitting my day job, but I am buying icing tips and bags and seeing if I can get better. :)

Thank you to Jan and the sweet girls at Dreamcakes!

Here, cake decorating by a beginner...


Jan's cake

Jan explaining the process

Fully frosted now


The final product! Happy Birthday, mom!

Now for some of my friends...


Shaun and her adorable cake!

Sarah's lip-tastic cake!


The general theme of my life... :)

Wednesday, February 24, 2010

Peanut Butter Bars

Do you ever look at the recipes on boxes? I'll admit I rarely do. I just empty the contents, make my food and move on. But I picked up a box of Krusteaz Bakery Style Peanut Butter Cookie Mix recently and found their recipe for Peanut Butter & Chocolate Bars.

Perfect, I thought! I have some extra chocolate chips and some extra peanut butter chips. I'll mix those. It'll be great. And then last Friday, I ran across the Foodie Friday First Anniversary post over at Designs by Gollum. Ahhh, well. She does do it better! :)


So here you go... Peanut Butter & Chocolate Bars

Ingredients
1 box Krusteaz Bakery Style Peanut Butter Cookie Mix
1 tbsp water
1 egg
3 tbsp vegetable oil
1 cup chocolate chips
1 cup peanut butter chips

What You'll Do
- In a large bowl, blend the water, egg, and vegetable oil. Add cookie mix and blend until dough forms. Hand kneading is necessary.

- Lightly spray a pan. They recommend a 9x9x2. I used a 11.5x7, I think. (Is that even a size? ha!) Press dough into the pan. I made a bit of a lip on the sides all the way around.


- Sprinkle the chocolate and peanut butter chips, pressing them into the dough.


- Bake 22 to 28 minutes.


I'll be looking at the recipes on the boxes from now on!

Blessed with Grace

Tuesday, February 23, 2010

Broccoli Cheese Chicken Casserole

Let's have a quick heart-to-heart. How often do you walk into your kitchen, have zero planned for dinner, throw your hands up in disgust, and just order a pizza?

Guilty as charged. Very guilty as charged.

But not this time. No ma'am. I had things in my fridge and pantry that needed to be used and a quickly-dwindling back account that didn't.

So what did I come up with? Cheesy Broccoli Chicken Casserole.

The name needs some work, but the dish is delish!

Ingredients (all were in my fridge/pantry, and I bet they're in yours too!)
1 pound boneless, skinless chicken
2 cans condensed broccoli and cheese soup
1 package frozen broccoli cuts, cooked and drained
1 12 ounce container sour cream
3 tbsp butter
1 pack butter crackers (about 30 crackers)

What You'll Do
Preheat your oven to 350 degrees.

Chop the chicken into bite-sized pieces and cook in a skillet until done, about 5 minutes (depending on the size of your chicken).


In a large bowl, combine condensed soup, broccoli (that has been cooked and drained -- I love Steamfresh for this!), and sour cream. Add chicken and mix well.


Spray a casserole dish (I used a 2-quart pan) lightly with cooking spray. Pour chicken mixture into pan and spread out evenly.


In a microwave-safe bowl, melt butter. Put butter crackers into a zip lock bag and crush. Mix butter and crackers and spoon out on top of the casserole.

Bake in the oven 35 to 40 minutes or until hot and bubbly. I served this with a side of green beans (double the veggies) and mini roasted potatoes.


It makes great leftovers too!

Monday, February 22, 2010

Free Flapjacks

Tomorrow only, the International House of Pancakes (IHOP) is celebrating their fifth National Pancake Day by offering a free short stack to... everyone!


In exchange for the free grub, IHOP asks you to make a contribution to Children's Miracle Network or a local charity of your choice.

Their fundraising goal: $1.75 million!

Go grab a stack. And you know, give a little.

Psst... you can even receive a celebrity wake-up call so you don't miss out on the giving and getting!

Friday, February 19, 2010

Pizza Pasta

This is an oh-so-fun, kid-friendly spin on pizza and pasta (two of my favorite things). You can mix and match any of the "toppings" for whatever your family likes. If you try this, let me know what you used. I'd love to try other ideas.


Ingredients
1 (12-ounce) package penne pasta
1 small onion, chopped
1 (14 ounce) jar pizza sauce
1 (8 ounce) can tomato sauce
1 (3 1/4 ounce) package sliced pepperoni, cut in half
1/2 cup sliced fresh mushrooms
1 small can sliced black olives
1 1/2 cup shredded mozzarella cheese

What You'll Do
- Bring a large pot of (lightly) salted water to a boil. Stir in pasta and cook until pasta is al dente. Drain.


- In a skillet over medium heat, cook the onions until tender.

- In a large bowl, mix the pizza sauce and tomato sauce. Stir in the onion, pepperoni, mushrooms, olives, and 1/2 cup of mozzarella cheese. Gently mix in the cooked pasta until pasta is evenly coated. Transfer to the prepared baking dish.

- Cover with aluminium and bake 30 minutes.

- Remove aluminium, top with remaining 1 cup cheese and bake for 15 minutes or until cheese is melted.

I'm joining this blog party today...

Blessed with Grace

Thursday, February 18, 2010

Creamy Dreamy Goodness

Don't let the name scare you. Here it is... Pots de Créme. Ahhh!


Okay, really, it's not hard (coming from a person who stops reading a recipe if the ingredients number more than 6), and the end result? Well, it's soooo worth it. They are delicate, delicious, dark chocolate goodness, and you'll feel ultra proud of yourself when you can say, "Here, try one of my pots de créme."

Ingredients
8 ounces bittersweet chocolate, finely chopped (I used chips this time, but I would even chop chips.)
2 1/2 cups heavy cream
2/3 cup whole milk
1/2 cup sugar
2 teaspoons vanilla extract
6 large egg yolks

What You'll Do
- Preheat your oven to 300°F. Put 8 6-ounce ramekins into a large pan. (I had to use two different ones because my ramekins are larger than circular ones.) The ramekins should fit without touching.


- Put chopped chocolate in a bowl. (I used glass because the bowl needs to be heatproof.) In a pan over medium heat, warm cream, milk, and 1/4 cup sugar. Whisk often, until sugar is dissolved. Bring the mixture to just simmering. Remove from heat, stir in vanilla and pour over chopped chocolate. Let the cream and chocolate stand three minutes to melt chocolate. Then, whisk until smooth.


- In a second bowl, whisk remaining sugar and egg yolks until well combined--no more than two minutes. (It's important to wait until you're ready to move along to mix the sugar and egg yolks.)


- Whisking egg and sugar mixture vigorously, slowly pour about 1 cup of chocolate/cream mixture into the eggs. When well mixed, pour in remaining chocolate mixture, whisking well.

- Strain mixture through a fine-mesh sieve into a large measuring cup. This is to remove any grit from the chocolate.


- Evenly pour chocolate mixture into each ramekin.


-Pour enough hot water into the pans so that the water comes halfway up the sides of the ramekins. Carefully transfer the pan(s) to the oven and bake until custards are set, 25 to 35 minutes. (This is when they jiggle slightly but aren't liquid still.)


- Remove ramekins from water bath. Let cool to room temperature. Cover loosely with plastic wrap and place in fridge to chill, at least 1 hour. Top with a dollop of whipped cream and a little sprinkle of colored sugar for that extra kick of cute. Then enjoy!


I love making desserts in little ramekins. Do you have any other fun ones I should try?

Wednesday, February 17, 2010

Penny Pasta

This dish is called "Penny Pasta" because this whole dish is under $5 -- and two of the items were once a penny item at Publix. I do a good job at getting the penny item each week, but not such a good job at figuring out how to use it.

If I can say so myself, this was so yummy! So fresh and yummy. It'll be even better in the summer when I can substitute or supplement the zucchini for other yummy veggies like squash and eggplant (and for a lot less $$$).


Ingredients
8 ounces pasta (any kind; I used a combination of penne and farfalle because I had a little of both.)
4 teaspoons olive oil
2 cloves garlic, minced
2 shallots (or 1 medium onion), sliced thin
2 medium zucchini, sliced into 1/4-inch slices
2 cans (14 1/4 ounces) Italian-style diced tomatoes
1/4 teaspoon salt
1/4 teaspoon black pepper
freshly grated Parmesan cheese

What You'll Do
- Cook the pasta according to package directions. When it's finished, drain the pasta. Add 2 teaspoons olive oil, stir throughout, and keep the pasta warm.

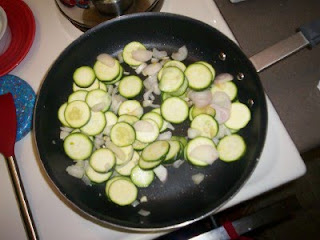
- Heat remaining 2 teaspoons of olive oil in a large nonstick skillet over medium heat. Add zucchini, shallot, and garlic to pan. Increase heat slightly. Saute until lightly browned. Once browned, remove vegetables from skillet and cover up to keep warm.


- In the same skillet (so as not to make a huge mess), add tomatoes, salt, and pepper. Cook on medium-high heat until it's thickened (about 13 minutes). Stir in vegetables. Serve tomato-zucchini mixture over pasta. Sprinkle with cheese if you wish.


Enjoy!

LinkWithin

Related Posts with Thumbnails