Showing posts with label birthday. Show all posts

Friday, July 23, 2010

Princess Cupcake Toppers

As promised in yesterday's post - printable cupcake toppers for you!


There are two ways to this...
1) Click on the image below, and it'll take you to a full-size picture.
2) Click on the Scribd link, and download the document.

In case you have a 4-year-old party coming up soon, here are some 4 buttons. For best results, I'd suggest printing this on thicker (read: cardstock) paper. Then punch out with a scalloped edge punch. I made the purple background bigger than most punches so that the color will be continuous once you punch it out.

Scribd link here.

Happy Birthday buttons. I'd suggest doing the same for these as suggested above for the "4" buttons.

Scribd link here.

This is another Happy Birthday option. A fun font with hearts over the i.


Scribd link here. (I think Scribd is returning the fun font to Times New Roman. You can also get the fun font on my Photobucket account here.)

This adorable castle topper started out as a black-and-white coloring page and clip art. You can find the original here.

Scribd link here.


See something you like? Print it. Share it. Email it. But please, link back here when you do.

Wednesday, July 21, 2010

Princes and Princesses

Fairy tales are where the real magic happens. The dashing knight leaps to the rescue of the beautiful princess without a moment to spare. A green, lumpy frog can transform into a handsome prince after all. And always, the perfect couple walk arm in arm together, into Happily Ever After.

So for just a day - let's all be princesses and princes, shall we?


Princess crowns for every young lady at the party.


A shield of his very own for every young man. (The T - for the birthday girl, of course!)


For this at-school party, a moment of fancy-free fun, conversations of castles and fairy tales. Talk of sword battles and heroes' welcomes.

Birthday party perfection.


Make your own crowns and shields.
In order to reach maximum royalty status on the day of a princess party, be prepared to make a HUGE (semi-manageable, if you try) mess.


What You'll Need
2mm-thick foam sheets - We did purple and pink for the crowns; blue and white for the shields
Headbands - Kids' headbands 4 for $1 at a dollar store.
Pack of glittered, princess-themed foam stickers
Scissors
Glue
Paint or glittered glue for the initials
Double-sided foam tape for attaching shields

What You'll Do
1. Draw or trace a crown and shield of your choice. I free-handed the crown, and my roommate traced the shield from a computer image.
2. With a thin-tip Sharpie, outline the crowns and shields onto the foam and cut out.
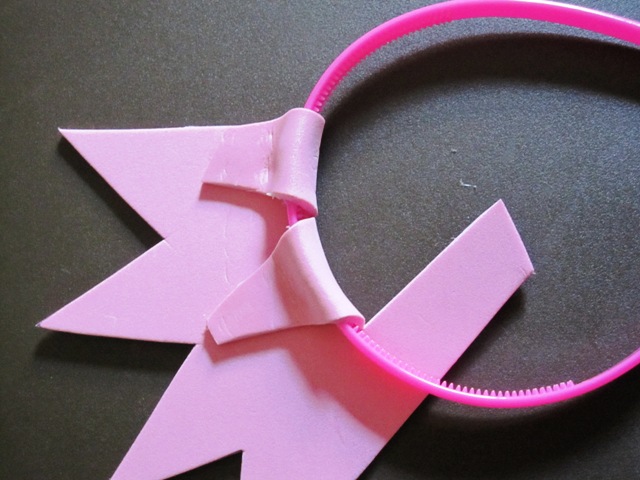
3. It's important you make the bottom portion of the crown longer so that you can make cuts into the foam to wrap around the headband. As you wrap the cuts around, dab some hot glue and hold until it's secured.


4. Cut out dots in a coordinating color for the points. Glue on with a dab of hot glue or school glue.


5. Decorate as you like. Or, if time permits at a party, put the crowns and stickers out for them to decorate. Very fun!


6. Cut the two pieces of shield, one larger than the other. Glue them together with hot glue or school glue.


7. With paint, marker, or glittered glue, make your decoration. In this case, a letter T for the birthday girl.


8. Use the double-sided foam tape to attach to clothes. This was easiest for this party, but you could always apply pins.


Then enjoy all the knights and princesses.


What is your favorite princess tale?
Mine? Sleeping Beauty.


See something you like? Print it. Share it. Email it. But please, link back here when you do.

Tuesday, July 20, 2010

Inspiration

purlsoho.com | Mowielicious
Hammond's Candies | Pink Sherbet Photography
Woman's Day | Ice Cream Cone | SashaSews
Cupcakes Take The Cake | Country Living
Red Stamp | Martha Stewart


See something you like? Print it. Share it. Email it. But please, link back here when you do.

Monday, July 19, 2010

Birthday Party Links

A sweet girl in my life (we'll call her T) just turned 4, and we celebrated in big style for her birthday. So this week I'll be sharing some fun birthday things we did for the big day, as well as some other happy things I've run across while planning.

And what's better for birthday celebrations than free things?


July is Pilgrim's birthday, so head over to draw! pilgrim (click here) because each day she's giving away free printables for an amazing birthday party celebration. (I really love the colors she uses!) By the end of the month, you'll have everything you need for an out-of-this-world party.


Will someone throw me a bubble party??? With the Bubble Party Printable Pack from Amy at Living Locurto, you've got everything you need for a fabulous party.


Yellow Mums has a free download for these great favor boxes. They'd be great for anything, from a birthday to a bridal shower.


Cake pops are such a fun way to bring cake to the party, without all the slicing and icing and mess. Little Miss Momma has a great tutorial for these great cake pops.

Kimberly


See something you like? Print it. Share it. Email it. But please, link back here when you do.

Wednesday, May 5, 2010

So why haven't I been blogging?

That's a good question.

1) With the loss of my computer and my camera, I am basically left helpless. But replacements have been made/found, so let the good times roll... soon!

2) I've been working on a big project at work, so that's consuming 98% of my time.

3) I have been doing some creating and making. I'm just a bad blogger and keep forgetting to post pictures and information.

Like this for example: A Breakfast at Tiffany's Birthday Party. Yesterday was my sweet roommate's birthday, and she decided to throw a potluck breakfast party. It was a blast! Just check out all the details here. (I made the Blueberry French Toast Casserole and did the decorating. I'll share the recipe tomorrow.)

My sincere apologies for being a bad blogger and bad blog friend. Life will get back to normal, and I will get back to seeing all the great things you all are doing.

Friday, November 6, 2009

Baby Bites and Flags

The highlight of the evening: baby bites from Pastry Art Bake Shoppe and cupcake flags from Laurenmakes.


Baby bites are little pieces of heaven. Small bites of cake wrapped in layers of decadent icing. Possible flavors: red velvet, chocolate, turtle, vanilla, strawberry, caramel, espresso, german chocolate, and many others. I dare you to only eat one.

Laurenmakes is a co-worker who makes amazing little flags for foods and cupcakes. She worked with me to match the purple on these mini flags to the purple I was using for the party.

Wednesday, November 4, 2009

A Table Setting

It's simple to put all your food out on a table and call it done. It's not so easy to arrange everything and present the table in an interesting manner. I just don't have an eye for that sort of thing. Thankfully, my friend Eric came to my rescue. This table arrangement is quite possibly the easiest thing to set up. And in the end, the results are amazing.


First things first, clear the table.

Then, take bowls (I used mixing bowls and a stray pot or two) and turn them upside down.

Next, take a fitted bed sheet (yes, you heard me right--a fitted bed sheet) and cover all the bowls and most of the table top. Make sure the elastic is tucked gently under. (You don't want to give away your secret.)

Then take the flat sheet and rope it through your bowls. This is where your artistic eye gets a jump start. It really doesn't have to be anything grand. You're just adding volume.

If you happen to have other pieces of material (I had some black squares from an earlier party), scatter those around the table. Again, it's really only volume and a splash of color, not the focus.

Then, take your serving platters and perch them on top of the upside-down bowls. The varying heights of the bowls add the dimension to your platter arrangements. I gathered all the crystal serving pieces from family members. I also served on crystal salad plates to keep the theme going.

I found a few candles at the dollar store and positioned them here and there. The white roses were added for a bit of freshness, and to help party guests identify the foods, I made labels from left over invitation paper.

And that's it!

It really was one of the easiest things I've done. So thanks to Eric, I am no longer intimidated by table settings. I received quite a few compliments on the table. (And they had no idea it was my queen-sized bed sheets!)

Tuesday, November 3, 2009

Bucket o' Soda

In my post yesterday, I chose a cream and black damask pattern as my decorative paper for the invitations. I tried to run the damask pattern, as well as the colors of cream, purple, and black, throughout the party.

I wanted a bucket in which to corral drinks to keep people from opening the fridge numerous times. (Plus, my fridge is in a back corner of my kitchen, and the flow of traffic would cease if multiple people needed to sneak back there for a beverage.) And because it was super chilly the night of the party, I put the bucket outside where the cold air helped keep the drinks cool.

So, this was my solution:


I found the bucket at a costume supply store for $1.99. The buckets only came in Halloween colors (black, purple, and orange), but seeing as two of my colors were black and purple, I was in luck. Next, I went to a craft store and dug in the fabric and ribbon section until I found a one-inch-wide grosgrain ribbon with damask patten. It was 50-percent off that day, so I got one three-yard spool for $1.50. Finally, all I needed was some double-sided tape to help the ribbon stay in place.

I tied the ribbon around the bucket very haphazardly, just enough to keep it on while I worked. Then I began on one side, worked my way around taping the ribbon to the bucket. You'll have to do minor tucks and folds since the side of the bucket is sloped. When I got to the bow, I tied a square knot, taped the bow loops up just a bit, and I was ready to ice down my drinks.

For less than $5, it was a simple project with great results. Even better - it's completely reusable. And if the damask pattern doesn't match my next party, all I have to do is take it off and tape on another ribbon.

Here's a close-up of the bow.


I'm sharing this post...

giveaways

Monday, November 2, 2009

Step 1: Invites

To celebrate my champagne--or golden or lucky--birthday (I turned 25 on the 25th of October), I held a little get together at my apartment. It was such a wonderful evening with my most favorite people.

This week, I'll be showing you what I did to pull the evening together.

First up: Invitations


This invite really is simple to make, but it delivers a big punch when your guests first open their envelopes.

Start by going to a local craft store. I usually shop first in the scrapbooking aisle as you can buy individual sheets of paper instead of dedicating yourself to an entire 50-page pack. Buy multiple sheets of a decorative paper you like for your party (one sheet makes four invitations) and some corresponding vellum and ribbon. With the decorative paper, I try to keep it simple but interesting - a few colors but a great design.

To print the wording, I used a publishing program on my computer to set up four separate areas and then copied and pasted the matching text. This takes a few tries to get everything lined up. Instead of using your valuable vellum, practice first on an ordinary sheet of paper.

Now begins the construction phase. Cut your decorative paper into fourths, making 4 smaller rectangles. Do the same to your vellum (which now has your printed wording). You might also want to cut off a little additional vellum so the decorative paper forms a sort of border for the text.

Line up the vellum paper with your decorative paper. Using a single-hole punch, punch two holes at the top of the invite about an inch apart.

Cut a piece of your matching ribbon (be sure to buy ribbon with a smaller width) to about 6 inches. Strand the ribbon through the front and then up through the holes to the front. Cut off the ends at an angle (they will likely have frayed from the pulling).

Now you have your inexpensive, but ultra chic, invitation.

I've made this same style of invitation for a bachelorette party, birthday parties, baby showers, and a wedding shower. It's simple and lends itself to lots of themes.

LinkWithin

Related Posts with Thumbnails