Showing posts with label halloween. Show all posts

Wednesday, October 20, 2010

You've Got Candy Corn on Your Shirt

Stick with me here. I'm using this new publisher Blogger introduced a while back (and I just found), so if this post looks weird or wonky, let me know.

I'm sure by now you've seen the adorable Candy Corn Ruffled Tee Amy from Positively Splendid posted last week. She matched it with an adorable ruffle skirt, and her little girl might be the cutest Halloween goodie out there!

Since my mom is a kindergarten teacher and can get away with wearing cute things (whereas I just get stares of confusion and concern), I decided to make her something very similar!


I chose to make the shape a bit more off center - to give it a somewhat whimsical look. I put it on black fabric so it would stick out more against the white shirt. All in all, I think it's super cute! Thanks, Amy, for sharing!

And tomorrow, I'll post my own tutorial. But of course, check out Amy's if you want to get busy making your own ruffled candy corn tee before then.


See something you like? Print it. Share it. Email it. But please, link back here when you do.

Sunday, October 17, 2010

Easy Like Sunday Morning

What's easy, you might be asking? Printing out adorable free Halloween goodies!

Like these candy corn cupcake toppers from Yellow Mums. Each Friday she puts up wonderful (and free!) printables. It's the first site I visit on Friday mornings.

Picture from Yellow Mums.

I can't wait to make some Halloween cupcakes and use these as toppers. You could also make ties for Halloween goodie bags, adorable mini garland, or stickers. Lots of options. Lots of fun!


See something you like? Print it. Share it. Email it. But please, link back here when you do.

Friday, October 15, 2010

Get Your Halloween Freebies!

Happy Friday! (I think those may be two of the best words in the English language.) You all remember my friend Lauren, right? ("Hi, Lauren!")


She just opened a new stationery shop, Pinwheel Press. She also created the new attempting creative title image for this web site. She's a very talented graphic artist. And other than the fact she's an Alabama fan, she's pretty awesome all the way 'round. (Plus, she has the most adorable dog.)

That's Murphy. He's the best.

To add to that awesomeness, she is giving away free printables of some of my most favorite things she's ever done: the Halloween tags!! They don't have to cupcake flags. You could use them for just about anything. In fact, if you do use them, send me some pictures of what you did. I'd love to share!


Go get 'em here. And tell her Kimberly sent you!


See something you like? Print it. Share it. Email it. But please, link back here when you do.

Monday, October 11, 2010

Last-Minute Halloween Wreath

I had great intentions of making a wonderful Halloween wreath yesterday because every holiday does deserve a great wreath. I had plans for a skull with a bow tie cut from felt. It was going to be super cute.

Then...

I went grocery shopping, picked up some last-minute items for the crafts I'll be sharing this week (including the wreath), and was pumping gas.

As I'm pumping gas, I feel this shudder, and the soda I had placed on my trunk fell to the ground.

Earthquake? No. (But not unheard of in these parts.) Slamming door? No. My car is locked.

That's when I realized what had actually happened.

Someone backed into my car.

Boom.

Crunch.

Now thankfully, the damage isn't so terrible. It's just a bad scratch. But it's definitely noticeable, and it makes my heart hurt for my little Malibu.

You see, I'm dedicated to this car. It's 10 years old now. I bought it when I graduated from high school, and it was to be my college car. ('Cause you know, as soon as I graduated college, I was going to be rich and buy a new one.) But now that we're past that and into reality, this car and I are going all the way. To like at least 2015.

So the fact it's all banged up hurts my heart. But, we'll get her patched up soon enough. She's been through a lot. We've been through a lot. But we've got more time together on this Earth.

That's why my great wreath plan turned into a "How can we make an awesome wreath fast?" kind of thing.

Here's what we got. And I love it! (Even if it wasn't my original plan.)


Just used one of these wire wreath forms. I paid about $2 at Michael's with a Coupon. It's super light, and it allows you to tie the feather boas to something for a bit of support. A piece of cardboard cut into a circle would work well, too.


Then top it with a simple bow. I used orange. 'Cause it's Halloween and all.


For a "This day did not go as I expected" kind of craft, it still looks great, I think! Have you seen any Halloween wreaths you just love?


See something you like? Print it. Share it. Email it. But please, link back here when you do.

Wednesday, October 6, 2010

All My Men

Halloween's leading men: Jack, Drac, and Frank.

In pop art style.

I'm in love.


SYS Thurs
See something you like? Print it. Share it. Email it. But please, link back here when you do.

Tuesday, October 5, 2010

Spooky Art

Spray paint is a cure-all.

It covers everything. Makes mismatched items look like they belong together. And makes dollar-store frames art!


I took down the normal art in the entryway and replaced it with this (temporary) spooky art.


Total cost for this art project: About $13. Everything is either from the dollar store or the dollar bins at Target.


See something you like? Print it. Share it. Email it. But please, link back here when you do.

Monday, October 4, 2010

Door Handle Decoration Tutorial

Did everyone have a good weekend? I spent the entire weekend with my mom and my brother. We toured the University of Alabama-Birmingham, relaxed, watched some football, and took in this beautiful fall weather we're finally having down here. We also did some crafting, and I can't wait to share with you what all we came up with.

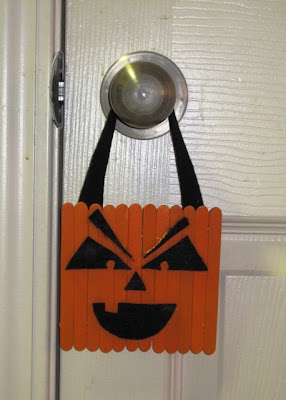
For now, here's a tutorial for the door handle jack o' lanterns I posted Friday. It would be so fun to make ghosts, monsters, or witches like I made these jack o' lanterns.


Place two popsicle sticks horizontally. Then stack popsicle sticks vertically. You can glue the popsicle sticks together, then paint them.


Or, you can paint each individual stick, then glue them together after everything is dry. I did one each way, and I think it's easier to glue together, then paint. But it's up to you.

I used one of the Glidden Paint Testers I got a few months back when they were doing a giveaway. The color is Pumpkin Patch. Very fitting, I think.


Using black felt (a sheet of felt is about 50 cents at Hobby Lobby), cut out a jack o' lantern face. Use the internet for inspiration, as there are lots of fun faces out there.

Then hot glue (or craft glue) the pieces of face onto the popsicle stick background.


Cut a longer piece of felt (or ribbon), hot glue it to the back, and let cool/harden.


Then you're all done. So simple and fun!


See something you like? Print it. Share it. Email it. But please, link back here when you do.

Friday, October 1, 2010

There's a Jack o' Lantern on Your Door

Popsicle sticks + orange paint + felt = jack o' lantern door handle love

It's October. Every inch of my little apartment is about to be Halloween-ed out. I can't wait to share more with you guys.


A tutorial for this tomorrow!


See something you like? Print it. Share it. Email it. But please, link back here when you do.

Thursday, September 30, 2010

You know what time it is?

It's almost October.

And you know what that means?

Pumpkins.


See something you like? Print it. Share it. Email it. But please, link back here when you do.

Thursday, October 29, 2009

You've Been Boo-ed

In college, I was a member of a service sorority, and every Halloween, we went trick or treating for canned goods to donate to local shelters. During our trick or treating, I started noticing these "You've been boo-ed" signs in everyone's door. Finally, I stopped to ask. Turns out, a trend is sweeping the nation. A yummy and fun trend!

It's called Boo-ing, and it goes like this.


1) You go to You've Been Boo-ed's web site and print out the card.

2) Fill two bags (or pumpkins) or baskets FULL of goodies. It can be homemade treats like breads, cookies, cake. It can be candy and chocolate. It might even be a basket full of scary movies, popcorn, and soda for the family to use in their Halloween celebration. However you choose to fill it is up to you.

3) You place the "You've Been Boo-ed" card in the basket, and you silently drop off a Boo basket at the front door of two neighbors.

4) They find the basket (surprise!), read the card, post the "You've been boo-ed" sign in their front door (so they are not boo-ed twice), and then they boo two neighbors. The chain starts from there!

It's a great way to spread cheer all around your neighborhood!

Now... off to boo some friends! Enjoy!

P.S. They have a Christmas version: Been Jingled

(From BeenBooed.com)

Wednesday, October 28, 2009

Pumpkin Seed Frenzy

Last night, I was introduced to a world I knew very little about... pumpkin seeds.

I went to my first "Wine & Knives" party, which was a lot more fun (and a lot less deadly) than the title implies. It was an ol' fashioned pumpkin-carving party, complete with lots of great food and wine. We carved, and we ate. Then we carved, and we drank. And finally, the pumpkin seed making began.

Once we had all removed the "guts" of our pumpkins, we washed off the icky (my descriptive word of choice for the insides of pumpkins) orange stuff to get to the seeds. (This takes some tugging and scrubbing, but it's worth it.) Then we tossed some of the seeds in a bowl with olive oil, some kosher salt, garlic salt, a little spicy something, maybe paprika, and toasted them for about 15 minutes on 375. Out came deliciousness like I have never known.

So it got me to thinking... What about a Pumpkin Seed Bar?


At your next carving, set out bowls of spices--sweet and savory. As guests take a break from carving or finish up a project, invite them over to make their own custom batch of pumpkin seeds.

Spices you might include: kosher salt, garlic salt, roasted garlic, paprika, cayenne, cumin, rosemary, dried basil, dried thyme, brown sugar, sugar, cinnamon, all-spice, nutmeg. You won't need a lot of each spice as a little goes a long way.

Provide guests with bowls and spoons. Let them combine and mix to their heart's desire. Then lay them out on a single layer on lightly-sprayed parchment paper, label the parchment with their name, put the parchment paper on a baking sheet and pop in the oven. Bake for about 15 minutes. As oven temps vary, watch your first batch closely. It may need less than 15 minutes.

Most guests won't eat all of them, so individual baggies might be handy.

For some delicious recipes, visit 101 Cookbooks. They have some great ideas you can whip up before guests arrive to inspire their creativity.

Happy Seed Making!

LinkWithin

Related Posts with Thumbnails