That's a good question.
1) With the loss of my computer and my camera, I am basically left helpless. But replacements have been made/found, so let the good times roll... soon!
2) I've been working on a big project at work, so that's consuming 98% of my time.
3) I have been doing some creating and making. I'm just a bad blogger and keep forgetting to post pictures and information.
Like this for example: A Breakfast at Tiffany's Birthday Party. Yesterday was my sweet roommate's birthday, and she decided to throw a potluck breakfast party. It was a blast! Just check out all the details here. (I made the Blueberry French Toast Casserole and did the decorating. I'll share the recipe tomorrow.)
My sincere apologies for being a bad blogger and bad blog friend. Life will get back to normal, and I will get back to seeing all the great things you all are doing.

Wednesday, May 5, 2010
Tuesday, April 20, 2010
A Gift for You
Because you all are my friends...
You can take part in these Friends & Family Subscription Discounts available now through June 21, 2010! (Yes, I work for this company, so it's legit.)

What kind of deals am I talking about?
People for $53 a year (Admit it - you read this with abandon! And just think about how much you spend every time you buy it at the grocery store)
Southern Living for $10
Sports Illustrated (for the man, of course) for $20
(Offer valid for new subscriptions only.)
You can take part in these Friends & Family Subscription Discounts available now through June 21, 2010! (Yes, I work for this company, so it's legit.)

What kind of deals am I talking about?
People for $53 a year (Admit it - you read this with abandon! And just think about how much you spend every time you buy it at the grocery store)
Southern Living for $10
Sports Illustrated (for the man, of course) for $20
Click here for more.
Gifts for your best friend, your mom, your husband, and, of course, you - solved!
Gifts for your best friend, your mom, your husband, and, of course, you - solved!
(Offer valid for new subscriptions only.)
Thursday, April 15, 2010
Top o' the basket
Having a two-bedroom apartment has its perks.


- Cleaning is a breeze--I only need ten minutes to vacuum the whole place.
- If I get stuck without toilet paper, I don't worry about being forgotten for thirty minutes--my roommate will be able to hear me if I call her name.
- In the summer, the air conditioner has to cool only 1100 square feet. Which is really nice come August.
But having a two-bedroom apartment has its downsides.
- I have to be creative with my storage. No one likes a plastic bin in place of a real coffee table.
- There are only so many places I can put my arts-and-crafts supplies before it's obvious I have a problem.
- I can store stuff under only two beds.
Enter a small solution for a big problem. Baskets with tops!

I'm what you might call a basket-aholic. I find myself saying on many occasions, "Well, you can always use a good basket." (Please tell me I'm not the only one!)
But here's the problem. When you fill them full, then what? You can't stack them - at least not neatly. I can't display mine; I don't have the room, and a basket of glue isn't very appealing to the eye.
So then I thought about it - a top! so I can stack! and hide!
Want to do it too? Here's how.
What You'll Need
Cardboard you can cut to size
Spray adhesive
Scissors
Material to cover the top

Making the basket tops might be tricky. (And since I lost the step-by-step pictures in the Great Computer Crash of 2010, I don't have those to show you.) But here's my best step by step.
For the basket tops
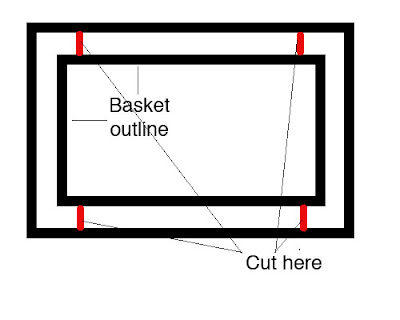
1. Lay the basket, opening side down, on top of the cardboard. With a pencil, trace around the basket. Then with a ruler, measure two inches from the basket's outline. Then connect the dots all the way around. (It's like making a picture frame.)

On the two longer sides, cut across the 2-inch gap to the basket outline.

Then fold all the sides in at the basket outline. Where you've cut the cardboard, you now have made four tabs that will be glued to the inside of the rim. Use glue or staples - whatever works for you. (I did a combo of some super-stinky adhesive that worked well and hot glue.) Hint: you might use a clothes pin or binder clip to hold the tabs in place while they dry.
Let those dry a few hours. (I left mine overnight.)
Next - pick out a fabric to cover the top. (One yard covered four tops for these baskets.) These baskets are in my bedroom, so the damask matches that decor. But how fun would it be to do bright colors for a little girl or boy's room?!


Iron it or steam the fabric, if you want. (I clearly didn't.) Then lay the fabric out with a basket top on it and get a general estimate of the size you will need to cover that top. Then cut it out.
If you have some sort of invisible ink, that may be helpful. You'll need about 3 extra inches around the basket's top to cover everything well.

Spray the top with adhesive (or use any other glue you like). Press the fabric onto the top, sliding your hand along firmly to get out any wrinkles or air bubbles.

When it comes to the edges and inside, I glued those down and tucked them into the corners as neatly as I could.

I folded the outside edges like a gift basket. (Sorry for the socked feet.)

You'll end up with this general look. You could cut the extra farbic off and not worry with tucking it in, but I wanted to wrap it around and into the top so it was covered completely.

Like this!

Then pop them on your baskets and stack away!
Have you ever done anything like this? What other storage solutions do you have? (I need all the help I can get!)
Wednesday, April 14, 2010
Spring Changes
I've been spring cleaning the blog! I've still got some changes I hope to make over the weekend, so excuse any odd things you might notice while I'm working. It's all for an improved Attempting Creative!
Furniture Update
This chest of drawers followed me through post-college internships into my new apartment about a year ago. Sometime a few decades back, my grandfather painted it yellow-green and antiqued it with gold. What was once very beautiful and trendy (I'm sure) was a little too retro, even for me. So for the new apartment, it got some new hardware and a coat of black satin paint.

Minus the fear I was sanding off lead paint (straight into my lungs), it was an easy process.


And the best part - if you're totally digging on the old handles - I found those exact ones at Home Depot. STILL.

Minus the fear I was sanding off lead paint (straight into my lungs), it was an easy process.


And the best part - if you're totally digging on the old handles - I found those exact ones at Home Depot. STILL.
Monday, April 12, 2010
A Moss Wreath
I have a quick update on my computer: it's definitely gone (along with all my files). And on top of that - I left my camera at my uncle's house this weekend! Agh! I just can't win.
But life goes on - and my phone has a camera - a good one at that.
So here's what I've been up to while my computer went to be in computer heaven.
I saw this a while back, and I had my inspiration bookmarked on my other computer, so if you've made a similar one (or know who has), let me know - I'd love to share where I got my inspiration.

It was super easy to make - well, except the gluing on of the moss. But even that wasn't so bad.
What You'll Need
Large wreath form
Moss sheets (I used one whole pack and a portion of a second.)
Glue (I used hot glue.)
Wide-width satin ribbon
And if you want the letter in the middle...
An initial, painted whatever color you'd like
Fishing line
What You'll Do
I sadly don't have step-by-step pictures of this anymore, so I'll just explain.
Step 1: When you open the moss envelopes, the sheets will break into chunks most likely. (If not, just gently tear it into strips.) With glue, attach the strips to the wreath. You will also have little chunks of moss to fill in any holes. To complete the look, gently massage the moss to fill in tiny gaps. Let it dry well.
Step 2: If you want the initial hanging in the middle, glue fishing line to the back of the letter in two places. Then pull the satin ribbon through and center the letter.
Step 3: Decide where you'd like to hang the wreath in your home. (I have mind hanging in front of a large mirror in the entrace of my apartment.) With the wreath hanging from the satin ribbon, determine the length you need for the wreath to hang where you want it. If you want, you can tie it off here and hang it. Or...
Step 4: Shift the ribbon so that you have a few extra inches on each side,. Then cut the ribbon free from the spool. Tie the ribbon so that it hangs where you'd like it to on the wall. Cut Vs in the ends of the ribbon and drape them over either side of the hook to hang the wreath. (It's somewhat hard to see in this picture how I've done that. My apologies.)
And that's it! Again, I'm sorry I don't have any step-by-step pictures.
I'm joining a few blog parties this week. Check out where you can party too on the right side of the screen. Take a look at what others are sharing!
Monday, April 5, 2010
Soup Can Facelift
If you saw my guest blog over at 733 during her Creativity Week back in February, you've seen this project already - but if not, here's a great new project, and I (almost) guarantee you've got all these supplies in your home right now.
Quick and Easy Pencil Holders 


I printed off my initial in a few different colors and styles.

Then, using a paper punch in any style or size, (I used a 2-inch square punch and a 2-inch circle punch, both with scalloped edges.) punch out the initial. On the opposite side of where the paper ends meet, glue the letter on.
And voila – you’re finished! A great (inexpensive and super easy) pencil holder – or marker holder, or pen holder, or anything-you-can-think-of holder!

I use the larger one beside my Cricut to throw away little shreds.

I'm joining a few blog parties this week. Check out where you can join them on the right side of the screen, and go check out with others are sharing.
What You’ll Need
An empty aluminum can
Scrapbooking paper
Ruler
Pencil
Scissors
Glue
2-inch punch of your choice
Initials printed on cardstock
What You’ll Do
Wash out and dry your can. Then remove the paper label.
Pick a scrapbooking paper or decorative paper of your choice. Measure the can’s height from just under the thick lip at the top of the can to the bottom.

Mark the length on the back of the paper and draw a line with your ruler and pencil where you’ll cut. Then cut the paper at that line.
Glue the paper to the can and wrap the paper around, gluing in a few places as you go. You’ll have a point in the back where the paper meets. On smaller cans, you might have to cut a little of the length off. On larger cans, you might have to add a patch.


I printed off my initial in a few different colors and styles.

Then, using a paper punch in any style or size, (I used a 2-inch square punch and a 2-inch circle punch, both with scalloped edges.) punch out the initial. On the opposite side of where the paper ends meet, glue the letter on.
And voila – you’re finished! A great (inexpensive and super easy) pencil holder – or marker holder, or pen holder, or anything-you-can-think-of holder!

I use the larger one beside my Cricut to throw away little shreds.

I'm joining a few blog parties this week. Check out where you can join them on the right side of the screen, and go check out with others are sharing.
Subscribe to:
Posts (Atom)