Tuesday, January 12, 2010

Teenage Wasteland: Wall Decor

In an effort to cover up the purple walls, William had plastered just about anything he could find on his walls: movie posters, old license plates, old sweat rags. None pleasing.

Before decorating began, we had a "Come to Jesus" moment about what would be going back up on the walls. I understood his need to "express" himself with his movie posters, and he (eventually) understood my need to keep it somewhat organized and clean.

First things first - We recruited our mom to paint something for above his bed. It had to be reflective of his personality and his interests. So they settled on this, and I think it's perfect!


Then he had some Andy Warhol prints I bought him last Christmas. Those were a must, as well as some pictures of London (a trip I gave him last New Year's). They are reflecting one another on either side of a bureau.


This mirror once hung in our uncle's bedroom as a child. It was painted (at some point in the last century) to match a chest of drawers I will be showing later. It's now hanging above the chest of drawers and serves as a check-in/check-out point for William as he comes in. He can make sure his hair looks good (well, good is relative) and that everything is together. [Notice Molly, the cat, has returned to his room and is watching me in the mirror.]


We found a good solution to his license plates and "borrowed" parking sign. These are hanging above his bedroom door and closet doors. They're out of the way, but they're still fun and add a lot to the personality of the room.


Have any of you had adventures in decorating a teenager's room? I'd love to hear about them.

Teenage Wasteland

If I say to you that my younger brother's bedroom was a wasteland, it would be an understatement. In fact, I could even get in line for understatement of the year. Our cat, Molly, was afraid to go in.

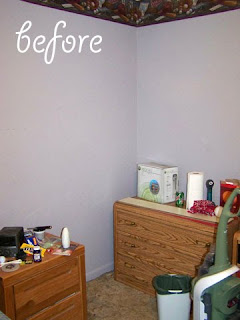
So over the holidays while I was at home "relaxing," William and I set out to redecorate, purge and make his room fit for a young man. The worst part about it -- it appears I failed to take/load pictures of his wasteland prior to our cleaning (read: exorcisms) and redecorating. But I've posted what I have, and in the event I stumble across some, I'll be sure to upload those.

This week I'll be showing you all the highlights of his room redo. Starting with what before pictures I have and for today, a snapshot of the after.


Because he's still in high school his room had a lot of requirements. It's not just a place to sleep, so decorating and organizing became a challenge. It is also a place...
  • to sleep
  • to get dressed
  • to practice his guitar
  • to entertain friends
  • to relax
  • to do homework
  • to store his worldly possessions
  • to express his teenage angst
For those many reasons, we had to come to terms with what we could and could not do in this room. It's a smaller room, about 12' by 10'. Only one wall is uninterrupted (no windows or doors), and it faces the wooded backyard, so there's very little natural light.

As you can see from the pictures, his walls were a tragic violet. When he was younger, my mom hand selected an antique gray to match a baseball border we put up. The paint chip looked perfect, but when we got it on the wall, it was purple. It took her a few years to come to terms with this mistake and a few more before we were willing to do anything about it.

First things first - Paint colors
Wall color: Baking Stone by Valspar
Dark Trim Color: Leather Chair by Valspar
Light Trim Color: Pure White by Do It Best
Accent Color: Bayside by Valspar


Here's a quick snapshot of the after. Stay tuned this week for more posts!


I'm showing off this room re-do at Between Naps on the Porch. Stop over to see what other bloggers are doing.

Thursday, January 7, 2010

Cheesy Dice

Okay, let me first say this: This is really cheesy (pun intended). But it's too fun not to do at your game night.

What is it? A Cheese Dice of course! And it's really easy to make.


Ingredients
1 (2 1/4 ounce) can sliced ripe olives (drained)
1 (8 ounce) package cream cheese (room temperature)
3 cups (12 ounces) shredded cheddar cheese
2 tablespoons mayonnaise
2 teaspoons Dijon mustard
1/2 teaspoon onion powder
1/4 teaspoon ground cayenne
1/4 cup sour cream
assorted crackers

Directions
Set aside about 20 olives. Finely chop the remaining olives.

In a bowl, combine chopped olives, cream cheese, cheddar cheese, mayonnaise, mustard, onion powder, cayenne, and sour cream. Mix until well combined.


(I had to use my hands for this next step.) Mound the cheese mixture onto your serving plate, and using a spatula, press all sides to form a cube. Cover wit plastic wrap and refrigerate for at least 2 hours. (With a little extra push, I could have made this more cubical, so it won't be that hard when you do it.)


Before serving, spread the remainder of the sour cream on the outside of the cheese ball. Be sure to smooth it with a long knife. Use the reserved olive slices to make the dice spots. Serve with crackers.


DIY Day @ ASPTL

Wednesday, January 6, 2010

Place Cards

These I love! For the place cards (there were only four of us, but it's still fun to have these), I used leftover paper from the invites and some awesome Thickers. Green, of course, for all the money we were about to make in a crazy poker game!

These couldn't be any easier to make. And there are so many possibilities!


Tuesday, January 5, 2010

Table Setting

Following my goal of trying to use what I already have instead of buying new, I tried to find things for my table setting and centerpiece without having to buy new things.


For the centerpiece, I did what many of you fellow bloggers did for your Christmas centerpiece -- I spray-painted limbs.


I think they turned out okay, and since this game night was so close to the holidays anyway, I could have easily used this for my holiday setting too.

To add a little extra, I used stencils to cut out spades, clubs, diamonds and hearts to hang from the limbs. I punched holes in the top and strung white yarn to hang them. How many you use is totally up to you.


For the place settings, I got really lucky. A few years ago, my brother attended a Las Vegas-themed school event. They had giant playing cards printed for decorations, and he was quick enough to snag a stack of them. I used them as placemats. Perfect, right? Then I put gold chargers on top for plates.


Since game nights are usually pretty busy and crazy, I wanted to keep decorations simple. Once the food has been consumed, the table is usually cleared pretty quickly to play games. So I think this table sets a good mood without being a pain to clear when it's time to break out the games.

The Girl Creative

Monday, January 4, 2010

Game On!

This week is Game Week at Attempting Creative. Lots of ideas for how to host your best night of board games, cards, and fun. I held my own Game Night last weekend and had a great time! I'd love to hear your ideas about your past Game Nights. Leave me a comment or e-mail me. Happy gaming!

First, you'll have to invite everyone. I wanted to make my game night as inexpensive as possible to host but of course with the most wow. So I tried to use things I could find around the house.

I had some great scrapbook paper and distress ink (which I just bought a few weeks ago to try and figure out how to use it as well as other bloggers do). I printed off card shapes from my computer and got to cutting.

Here, in photos, is the invitation.


Friday, January 1, 2010

I've Been Featured This Friday

In the most awesome possible way to start off 2010, I've been featured on The Girl Creative in her Feature Friday!!!

I'm so excited to be mentioned on her page. She has great ideas and an amazingly creative blog! Go check her out, and leave a comment so she knows how much I appreciate her featuring me.

The Girl Creative

LinkWithin

Related Posts with Thumbnails